Breakfast & Brunch
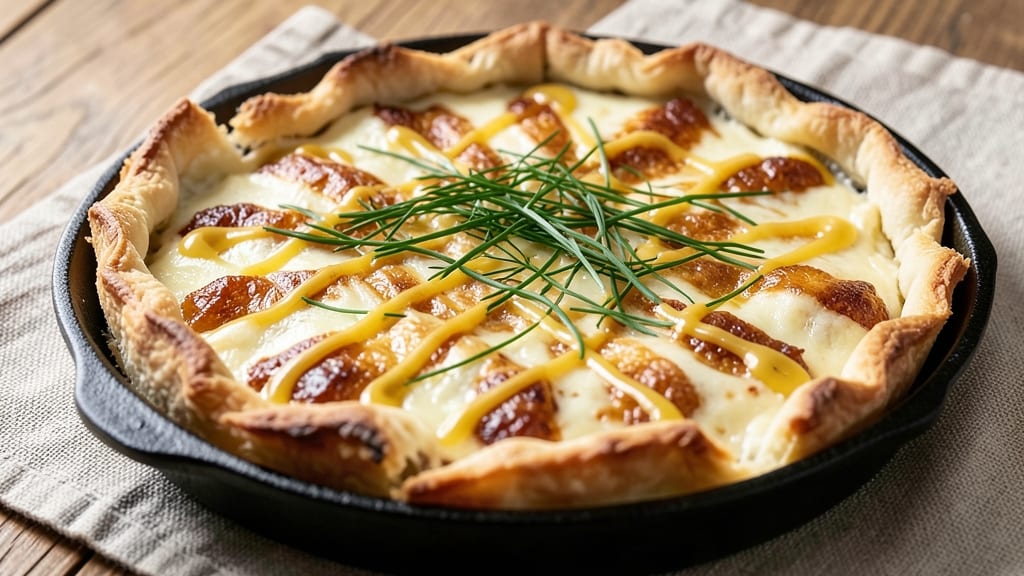
This cheddar cheese quiche recipe delivers the perfect balance of golden crust, melty cheese, and fluffy egg filling—a breakfast masterpiece that’s foolproof for any skill level. After years of testing variations, I’ve perfected a method that ensures crisp edges, tender centers, and that signature cheesy pull-apart texture.
The secret lies in the right ratio of eggs to cream and a precise baking time that transforms simple ingredients into restaurant-quality results.
The beauty of this quiche is its versatility—whether you use a store-bought crust for convenience or roll out homemade dough for that extra flaky finish. The filling comes together in minutes with sharp cheddar, a touch of mustard for depth, and fresh herbs that brighten every bite.
What makes this recipe stand out is how it bakes up with a crispy golden crust while keeping the filling perfectly set, not rubbery or dry.
By the time it emerges from the oven, you’ll have a quiche that’s visually stunning with its golden-brown top and bubbly edges, while the center remains rich and creamy. The aroma alone will fill your kitchen with warmth, making it ideal for brunch gatherings or a satisfying weekend meal.
Serve it with a simple side salad or crusty bread to soak up every last bit of that cheesy goodness.
This recipe scales beautifully for parties or meal prep, and the leftovers reheat perfectly—just a few minutes in the oven to restore that golden finish. Whether you’re a beginner or a seasoned cook, this cheddar cheese quiche will become a staple in your breakfast rotation.
Let’s get started on creating your perfect quiche.
Ingredients for cheddar cheese quiche
Simple ingredients transform into a restaurant-worthy quiche with golden crust and melty center.
| Ingredient | Amount | Notes |
|---|---|---|
| Store-Bought Pie Crust 🥧 | 1 package | Refrigerated, for convenience or homemade |
| Large Eggs 🥚 | 4 whole | Room temperature for even cooking |
| Heavy Cream 🥛 | 1 cup | Full-fat for creaminess |
| Sharp Cheddar Cheese 🧀 | 2 cups | Shredded, block preferred |
| Yellow Mustard 🍯 | 1 tbsp | Dijon works too for depth |
| Fresh Chives 🌿 | ¼ cup | Chopped, for freshness |
| Salt 🧂 | ½ tsp | Kosher or sea salt |
| Black Pepper 🌶️ | ¼ tsp | Freshly ground preferred |
| Garlic Powder 🧄 | ½ tsp | For subtle flavor boost |
| Unsalted Butter 🧈 | 1 tbsp | Melted, for crust brushing |
| All-Purpose Flour 🌾 | 1 tbsp | For egg wash if needed |
The crust sets the stage—store-bought is fine (I love the Pillsbury refrigerated kind for quick prep), but homemade takes it to the next level. If you're rolling your own dough, chill it for 30 minutes first—this prevents shrinking. For the cheddar, sharp is non-negotiable—it's what gives that signature tang. I grab mine from the deli counter at Whole Foods when I can, but any quality block works. Pro tip: shred it yourself—pre-shredded gets clumpy. The chives? Fresh is best, but dried will work in a pinch (use half the amount).
No heavy cream? Whole milk or half-and-half works, though the texture won't be quite as rich. Short on chives? Green onions or parsley add brightness too. The mustard is key—Dijon adds complexity if you've got it. For the egg wash, I often skip it entirely, but if you want that extra golden sheen, beat 1 egg with 1 tbsp water and brush it on before baking. The garlic powder can be swapped for fresh minced garlic (1 clove)—just don't skip it entirely.
Quiche reheats beautifully—5 minutes at 350°F restores that golden finish. Store leftovers covered in the fridge for 4-5 days, or freeze portions for up to 3 months. I like to slice it before freezing—just reheat straight from frozen. For meal prep, assemble the filling ahead and bake fresh the next day. The crust stays crispy if you reheat it covered with foil for 10 minutes, then uncover to brown.
Why You'll Love This Recipe
- Store-Bought Shortcut: I swear by this trick—just unroll that pre-made crust, no rolling or fussing. The only prep is cracking eggs and grating cheese, then it’s straight to the oven while you sip coffee.
- Cheesy Tangy Magic: That sharp cheddar and mustard combo? It’s like a hug in your mouth—salty, creamy, with just enough tang to wake up your taste buds. The heavy cream makes it rich without being heavy.
- Brunch or Snack: Serve it warm with toast for brunch or cold in lunchboxes—it’s equally good either way. Honestly, I’ve eaten it straight from the fridge at 3 PM with zero judgment.
- Budget Breakfast Win: Eggs, cheese, and cream stretch to feed four for under $10. Leftovers? Even better—slice it up for quick breakfast sandwiches or reheat portions in minutes. My wallet and mornings thank me.
Step-by-step instructions for cheddar cheese quiche
Here's how to assemble a quiche with a perfectly crisp crust and a rich, creamy cheddar center.
Prepare the Crust for Perfect Browning
Preheat your oven to 375°F. Remove the store-bought pie crust from the refrigerator and let it sit at room temperature for 10 minutes—this prevents cracking when you handle it. Press the crust into a 9-inch pie dish, making sure it covers the bottom and sides evenly. Trim any excess dough hanging over the edges with a sharp knife.
Prick the bottom of the crust all over with a fork to prevent puffing during baking. Line the crust with a sheet of parchment paper and fill it with pie weights or dried beans. Bake for 10 minutes until the edges begin to turn golden. Remove the weights and parchment, then brush the bottom and sides of the crust with the 1 tablespoon melted unsalted butter. This creates a beautiful golden finish and adds rich flavor. Return the crust to the oven for 2 more minutes to set the butter.
Mix the Filling to Creamy Perfection
In a large bowl, whisk together the 4 whole large eggs until they're fully combined. Add the 1 cup heavy cream, 1 tablespoon yellow mustard, 0.5 teaspoon salt, 0.25 teaspoon black pepper, and 0.5 teaspoon garlic powder. Whisk until smooth—this ensures an even distribution of flavors throughout the filling.
Gently fold in the 2 cups shredded sharp cheddar cheese and 0.25 cup chopped fresh chives using a spatula. Be careful not to overmix—just enough to combine everything evenly. The cheese should be evenly distributed, with no large clumps remaining. This step is where the magic happens—your quiche will have that perfect melty, gooey center thanks to the sharp cheddar and rich cream.
Assemble and Bake to Golden Glory
Pour the egg mixture evenly into the prepared pie crust. Use a spatula to gently smooth the top—you want an even surface for consistent baking. Sprinkle the 1 tablespoon all-purpose flour evenly over the top of the filling. This creates a light, crisp crust on top that contrasts beautifully with the creamy center.
Place the quiche on the middle rack of your oven and bake for 35-40 minutes. You'll know it's done when the top is golden brown, the filling is set but still slightly jiggly in the center, and the edges are bubbling. If the top browns too quickly, tent it loosely with aluminum foil after 20 minutes to prevent over-browning while the center finishes cooking.
Rest and Serve with Confidence
Remove the quiche from the oven and let it rest for 10-15 minutes before slicing. This resting period allows the filling to set completely and prevents it from running when you cut into it. The contrast between the crisp crust, creamy filling, and melty cheese will be perfect—each bite should deliver rich, cheesy goodness with a hint of mustard and garlic.
Slice into 6 equal wedges and serve warm or at room temperature. The quiche tastes best fresh from the oven, but leftovers keep well in the refrigerator for 3-4 days. For a restaurant-quality finish, garnish each serving with an extra sprinkle of fresh chives and a pinch of black pepper. Enjoy your homemade cheddar cheese quiche—it's worth every step!
Pro Tips For Making Cheddar Cheese Quiche
- Preheat That Oven: The crust’s your foundation, and a cold oven means a soggy bottom. Crank it to 375°F (190°C) and let it scream hot for at least 20 minutes before baking—yes, even with a store-bought crust. I learned this the hard way when my first quiche came out like a sad, greasy puddle.
- Shred Cheese Like a Pro: Sharp cheddar loses its edge when it melts into a gluey mess. Use a box grater (not a food processor) and shred it fresh—no clumping, no waiting. If you’re in a rush, pulse the cheese in short bursts, then finish by hand to keep the texture sharp. Trust me, your quiche will thank you.
- Blind-Bake the Crust: Store-bought crusts are convenient, but they still need love. Weigh it down with pie weights or dried beans while pre-baking for 10 minutes—this prevents puffing and keeps the bottom crisp. I skip this step sometimes, and the crust always ends up floppy. Don’t be that person.
- Whisk Eggs and Cream Cold: Room-temperature dairy makes for a dense, rubbery quiche. Whisk your eggs and heavy cream together in a chilled bowl, then pour the mix over ice-cold cheese—this keeps the custard light and fluffy. I was skeptical until I tried it; now it’s non-negotiable.
Make-ahead tips for this recipe
Prep Ahead for Crust
Roll out your pie crust the night before and store it in an airtight container in the fridge. This gives the gluten time to relax, making it easier to handle and reducing the risk of shrinking during baking.
I like to use a 9-inch pie dish from Wilton—it has a sturdy rim that holds the crust perfectly. If making homemade dough, shape it into a disk, wrap tightly in plastic, and chill for at least 4 hours before rolling. 💫
Filling Prep in Advance
Mix the egg and cream filling the night before, cover it tightly, and refrigerate. The flavors meld beautifully overnight, and the cheese won’t clump as much when you bake. I store mine in a glass Pyrex dish—it’s easy to reheat straight from the fridge.
Just whisk again briefly before pouring into the crust to distribute any settled cheese evenly. The mustard and garlic powder will deepen in flavor, adding complexity to every bite.
Partial Baking Method
For brunch crowds, bake the crust blind (with weights) the day before, cool completely, then wrap tightly in plastic. Store at room temperature until ready to assemble. When guests arrive, simply add the filling and bake for 35-40 minutes—no one will know it wasn’t freshly baked!
This method also works well for catering. I’ve served this at weekend gatherings, and the quiche always disappears first. 🍽️
Freezing Fully Assembled
Assemble the quiche completely, bake until the filling is just set (about 30 minutes instead of 40), then cool to room temperature. Wrap tightly in plastic wrap followed by aluminum foil, and freeze for up to 3 months.
To serve, thaw overnight in the fridge, then reheat covered at 350°F for 15-20 minutes until warmed through. The texture stays perfect—no soggy crust here! I’ve even reheated frozen slices straight from the freezer for quick breakfasts.
Make-Ahead Garnishes
Chop fresh chives and store them in a small airtight container with a paper towel to absorb moisture. Keep this in the fridge for up to 5 days.
For extra convenience, make a simple garnish mix ahead: combine 1 tbsp chopped chives, ½ tsp black pepper, and ½ tsp smoked paprika in a small jar. Shake over individual slices right before serving—it adds instant restaurant flair with zero effort. 💡
Portioning for Meal Prep
Slice the quiche into wedges while still warm (after resting), then store portions in single-serving containers. Reheat each portion individually at 350°F for 8-10 minutes—this keeps the crust crispy while warming the filling.
I pack these in my lunchbox for work; they’re perfect cold or reheated. For variety, alternate between plain slices and ones with extra cheese sprinkled on top before reheating. The possibilities are endless! ✨
Nutrition facts
Frequently asked questions
Can I use milk instead of heavy cream in this quiche?
You can substitute 1 cup whole milk for the heavy cream, but expect a slightly lighter texture. The filling may not be as rich or creamy. For best results, use half-and-half—it's a happy medium between milk and cream in both flavor and texture. The quiche will still be delicious, just with a more delicate mouthfeel.
Why did my quiche come out rubbery?
Rubbery quiche usually means the filling was overcooked or the egg mixture wasn't properly combined. Bake until the center is just set (it should jiggle slightly when gently shaken). Also, make sure your eggs and cream are at room temperature before mixing—they blend more evenly. For extra insurance, bake at 350°F instead of 375°F to prevent overcooking.
How do I make this quiche ahead for a brunch gathering?
Assemble the quiche completely and bake it until the filling is just set (30 minutes instead of 40). Cool completely, wrap tightly in plastic, and refrigerate for up to 2 days. Reheat covered at 350°F for 15-20 minutes before serving. The crust stays crispy and the center reheats perfectly. For a crowd, bake multiple quiches in different pans—it's easier than trying to slice one giant pie!
Can I add bacon or sausage to this recipe?
Cook ½ cup crumbled bacon or cooked sausage until crispy, then drain on paper towels. Fold it into the egg mixture just before pouring into the crust. For extra flavor, sprinkle the cooked meat into the crust first, then add the egg mixture. This adds a savory depth that pairs perfectly with the cheddar. Just reduce the cheese by ¼ cup to balance the flavors.
What's the best way to reheat leftovers?
Slice the quiche into wedges and reheat individual portions at 350°F for 8-10 minutes covered with foil. This prevents the crust from drying out while warming the filling. For microwave reheating, place a slice on a microwave-safe plate, cover with a damp paper towel, and heat for 45-60 seconds—the towel helps maintain moisture. Always reheat until steaming hot throughout.