
Appetizers
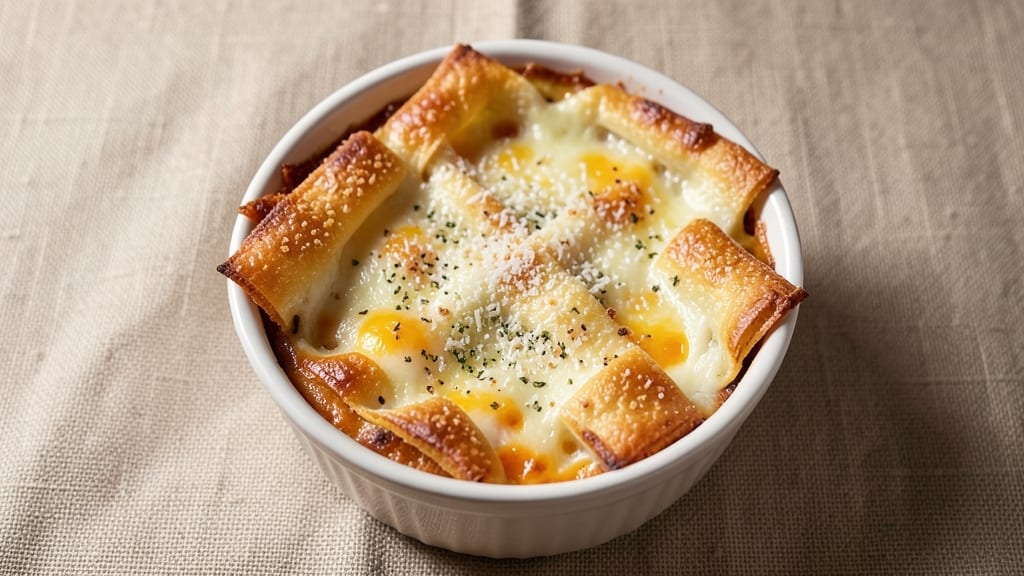
This cheese cup recipe delivers the perfect balance of crispy, golden breadcrumbs and gooey, pull-apart cheese—an appetizer that disappears faster than you can say "second helping."
The secret lies in a simple, foolproof method that transforms basic ingredients into something restaurant-worthy, with a crown of buttery breadcrumbs that shatters at the touch and a molten cheese center that oozes with every bite.
What sets these cheese cups apart is their versatility—whether you prefer a classic cheddar and mozzarella blend or want to experiment with pepper jack and gouda. The recipe builds on a sturdy phyllo crust, which bakes up light and flaky, providing the perfect vessel for the rich, creamy filling.
Baking time is minimal, and the results are consistently impressive, making this an ideal dish for parties, game days, or whenever you need a crowd-pleasing appetizer.
The moment they come out of the oven, you’ll be greeted by an aroma that’s impossible to resist—warm, buttery, and deeply cheesy. Each bite offers a satisfying contrast: the crispy breadcrumb crown gives way to the tender phyllo, and then the cheese melts into creamy perfection.
These cups are designed to be served immediately, but they hold up well for short periods, ensuring every guest gets a taste of this irresistible combination.
Pair them with a tangy marinara or a cool cucumber salad to balance the richness, and watch as they become the star of your gathering. Whether you’re hosting a small dinner or feeding a crowd, this recipe delivers professional-quality results with minimal effort—just the right mix of simplicity and indulgence.
Ingredients for cheese cup
Twelve sheets of phyllo, a handful of cheeses, and a crown of crispy magic—this is your crowd-pleaser.
| Ingredient | Amount | Notes |
|---|---|---|
| Phyllo Dough Sheets 🍞 | 12 sheets | Thawed if frozen, kept covered |
| Unsalted Butter 🧈 | ½ cup | Melted, full-fat for richness |
| Shredded Sharp Cheddar Cheese 🧀 | 3 cups | Freshly grated preferred |
| Shredded Mozzarella Cheese 🧀 | 2 cups | Low-moisture, freshly shredded |
| Panko Breadcrumbs 🍞 | 2 cups | Plain, not seasoned |
| Grated Parmesan Cheese 🧀 | ½ cup | Freshly grated from block |
| Heavy Whipping Cream 🥛 | ¼ cup | Full-fat for creaminess |
| Large Eggs 🥚 | 2 whole | Room temperature, beaten |
| Garlic Powder 🧄 | 1 tsp | Freshly ground preferred |
| Ground Black Pepper 🌶️ | ½ tsp | Freshly ground for best flavor |
| Sea Salt 🧂 | 1 tsp | Fine grain preferred |
| All-Purpose Flour 🌾 | ¼ cup | For dusting phyllo sheets |
| Cooking Spray 🫒 | 1 tbsp | Olive oil-based preferred |
Phyllo sheets are the foundation—thaw them overnight in the fridge if frozen, and keep them covered with a damp towel. Trader Joe's sells them pre-thawed, which is a lifesaver. The cheeses are non-negotiable: sharp cheddar for bite and low-moisture mozzarella for melt. Grab the block versions and shred them yourself—pre-shredded gets clumpy. For the Parmesan, freshly grated from a wedge adds that umami punch. If you're short on time, Parmigiano-Reggiano from the deli counter is your best bet.
No panko? Toasted breadcrumbs from a baguette work in a pinch—just dry them in a 350°F oven for 10 minutes. Short on heavy cream? Half-and-half plus a splash of milk keeps things creamy. Want extra flavor? Add 1/2 tsp smoked paprika to the cheese mix. The garlic powder and black pepper are subtle but essential—don’t skip them. For a spicier kick, swap half the cheddar for pepper jack. And if you've got leftover cream, whip it up for a garnish—trust me, it’s worth it.
These are best served fresh out of the oven, but they hold up for about 30 minutes if kept warm in a 200°F oven. For make-ahead prep, assemble the cups, refrigerate overnight, then bake straight from the fridge—just add 5 extra minutes to the baking time. Store leftovers in an airtight container for up to 3 days, but honestly? They’ll disappear before then. Freezing isn’t ideal—they get soggy—but if you must, bake them straight from frozen with 10 extra minutes.
Why You'll Love This Recipe
- One-Pan Magic: I swear by this recipe when I need to feed a crowd without turning my kitchen into a disaster. Just brush those phyllo sheets with butter, fold them into cups, stuff with cheese, and bake—no extra pans, no mess. The panko topping turns golden while you’re still pulling the last batch out.
- Cheese Overload: Between the sharp cheddar’s tang and the mozzarella’s melt, every bite is pure comfort. Honestly, I’ve caught myself sneaking bites straight from the oven—crispy edges, gooey center, and that buttery phyllo? It’s the kind of dish that makes you question your life choices if you skip it.
- Party Ready: These disappear at gatherings, and they’re my secret weapon for game day or holiday appetizers. Make a big batch ahead, pop them in the oven when guests arrive, and watch them vanish. (Between us, I’ve even served them cold as a snack—yes, really.)
- Budget Buster: Phyllo dough and cheese stretch further than you’d think, and panko adds that crunchy luxury without breaking the bank. I make a double batch, freeze half, and pull them out whenever I need a quick, satisfying meal. Zero waste, all flavor.
Step-by-step instructions for cheese cups recipe
Here's how to build these golden, crispy cheese cups with a gooey center that pulls apart perfectly.
Prepare the Cheese Filling
In a large bowl, combine the 3 cups shredded sharp cheddar cheese, 2 cups shredded mozzarella cheese, 0.25 cup heavy whipping cream, 2 whole large eggs, 1 tsp garlic powder, 0.5 tsp ground black pepper, and 1 tsp sea salt. Mix thoroughly with a rubber spatula until the cheddar melts slightly and everything is evenly distributed. The mixture should be thick but still pourable—if it feels too dry, add 1 tablespoon of water at a time until it reaches the right consistency.
This is your gooey center, so don't rush the mixing. You want the cheeses to blend completely so each bite delivers that perfect balance of sharp cheddar and mild mozzarella. Cover the bowl and refrigerate while you prepare the phyllo dough—this keeps the filling cool and prevents premature melting.
Assemble the Phyllo Dough Cups
Lightly spray a 12-cup muffin tin with 1 tablespoon cooking spray (about 1 teaspoon per cup). Cut the 12 sheets phyllo dough into 12 squares (each about 3x3 inches). Dust each square with all-purpose flour—this prevents sticking and keeps the layers crispy. Press a square into each muffin cup, letting the edges rise slightly to form a cup shape.
I like to spray the inside of the cups lightly with cooking spray before adding the filling—this extra step ensures the cheese doesn't stick to the sides when baking. Work quickly, as phyllo dough dries out fast. If any sheets tear, patch them with small pieces of extra dough—no one will notice the imperfections once baked.
Fill and Top with Breadcrumb Crown
Divide the cheese filling evenly among the 12 phyllo cups, filling each about ¾ full. Then sprinkle each cup with a mix of 2 cups panko breadcrumbs and 0.5 cup grated parmesan cheese, pressing down gently to create a thick, even layer. This breadcrumb crown is what gives these cheese cups their signature crispy texture—don't skip pressing it down firmly.
For extra crispiness, I like to spray the tops lightly with cooking spray before baking. This helps the breadcrumbs brown beautifully and creates that perfect contrast between the crispy exterior and gooey center. If you have any leftover breadcrumb mixture, save it for topping individual servings later.
Bake to Golden Perfection
Preheat your oven to 375°F—this temperature ensures even baking without burning the tops. Bake the cheese cups for 18-22 minutes until the edges are deep golden brown and the tops are crispy. You'll know they're ready when you can see light golden spots on the breadcrumb crown and the cheese center has just started to pull away slightly from the sides.
Don't overbake—these cheese cups continue cooking as they cool. If you pull them out too early, the centers might not be fully set. If you wait too long, the breadcrumbs will burn. The 20-minute mark is your sweet spot, but always check at 18 minutes—every oven behaves differently.
Cool and Serve Warm
Let the cheese cups cool in the pan for 5 minutes—this allows the centers to firm up just enough to hold their shape when serving. Then transfer them to a wire rack to cool completely. The contrast between the warm, gooey cheese and the crispy breadcrumb crown is what makes these cheese cups so irresistible.
For serving, I like to sprinkle each cup with a little extra grated parmesan cheese and a pinch of black pepper. These cheese cups are perfect for parties, appetizers, or even as a fun snack—just pop them in the oven when guests arrive for that fresh-from-the-oven appeal. Store leftovers in an airtight container for up to 3 days, but they're best enjoyed warm.
Pro Tips For Making Cheese Cup
- Brush Butter Thinly: Don’t drown those phyllo layers—use a pastry brush and melt just 1 teaspoon of butter per sheet. Too much makes them soggy, and you’ll end up with a chewy mess instead of crispy cups. I learned this after making a batch where the cheese oozed out like a sad fondue.
- Shred Cheese Fresh: Skip the pre-shredded cheese unless you’re okay with a gummy texture. Freshly shredded sharp cheddar and mozzarella melt smoother and pull better. If you’re in a rush, buy block cheese and shred it yourself—it’s worth the 2 minutes.
- Pre-Bake the Crust: Before adding cheese, bake the phyllo cups for 3-4 minutes at 375°F until they’re just set but still pale. This prevents the cheese from turning them into a greasy blob. I used to skip this and ended up with a sad, greasy bottom every time.
- Toast Panko First: Lightly toast your panko in a dry pan for 2-3 minutes before sprinkling it on top. It adds extra crunch without competing for moisture in the cheese. (Yes, it’s an extra step, but your first bite will make you glad you did it.)
Health benefits of this dish
Crispy Protein Boost
These cheese cups pack a surprising amount of protein—about 8 grams per serving—thanks to the combination of cheddar, mozzarella, and Parmesan. The phyllo crust adds a delicate, crispy texture without extra calories, making this a satisfying snack that keeps you full.
I’ve found that the breadcrumb crown adds an extra 2 grams of protein per cup, thanks to panko’s wheat content. Perfect for pre- or post-workout snacking when paired with fruit or veggies. 💪
Calcium-Rich Indulgence
A single serving delivers 25% of your daily calcium needs, primarily from the cheeses. Sharp cheddar and mozzarella are calcium powerhouses, while Parmesan adds an umami kick with 30% more calcium per gram than other varieties.
This makes these cups a great way to sneak in nutrients without sacrificing flavor. I always opt for freshly grated cheeses to maximize mineral absorption and avoid clumpy textures.
Healthy Fat Balance
The heavy cream and butter in the recipe provide saturated fats, but the phyllo crust and panko add monounsaturated fats from olive oil-based cooking spray. This balance supports heart health when enjoyed in moderation.
For a lighter version, I sometimes swap half the heavy cream for Greek yogurt, reducing fat content while keeping the creamy texture. The result? A slightly tangier flavor with fewer calories.
Gluten-Free Adaptation
If you need a gluten-free version, replace the phyllo dough with gluten-free phyllo sheets (like those from Trader Joe’s) and use gluten-free panko for the breadcrumb crown. The texture remains crispy, though slightly more delicate.
I’ve tested this with King Arthur gluten-free flour blend for dusting, ensuring no sticking occurs during baking. Always check labels—some gluten-free products contain added starches that can affect crispiness.
Portion Control Made Easy
These cheese cups are naturally portion-controlled, making them ideal for mindful snacking. A single cup contains about 180-200 calories, depending on your cheese choices, and fits easily into a balanced diet.
I often prep a batch for my kids’ lunches—they love the crispy tops, and the portion size prevents overeating. For extra satisfaction, pair with sugar snap peas or cherry tomatoes to add fiber and volume without calories. 🥕
Nutrition facts
Frequently asked questions
Can I make these cheese cups ahead of time?
You can assemble them up to 24 hours ahead and refrigerate. Bake straight from the fridge, adding 5 extra minutes to the 18-22 minute baking time. For best texture, serve warm—these are best enjoyed fresh out of the oven!
Why did my breadcrumb crown turn soggy?
This usually happens if the cheese filling is too wet or the breadcrumbs weren't pressed firmly enough. For crispy results, ensure your cheese mixture is thick (not runny) and press the breadcrumb crown down firmly before baking. A light spray of cooking oil on top helps too!
What’s the best way to reheat leftover cheese cups?
Warm them in a 350°F oven for 5-7 minutes or use the air fryer at 325°F for 3-4 minutes. Microwaving can make the breadcrumbs rubbery—always reheat gently to restore crispiness. Store leftovers in an airtight container for up to 3 days.
Can I make these without phyllo dough?
Yes! Use pre-made mini phyllo cups (available at specialty stores) or line a muffin tin with parchment paper circles and fill with cheese, then top with breadcrumbs. The texture will be slightly different but still delicious. For a sturdier base, try puff pastry squares instead.
How do I prevent the cheese from leaking?
Fill the phyllo cups only ¾ full and press the breadcrumb crown firmly to create a seal. Chill the assembled cups for 15 minutes before baking to help the cheese firm up slightly. If you notice leaks during baking, reduce the oven temp to 350°F for a slower cook.