Appetizers
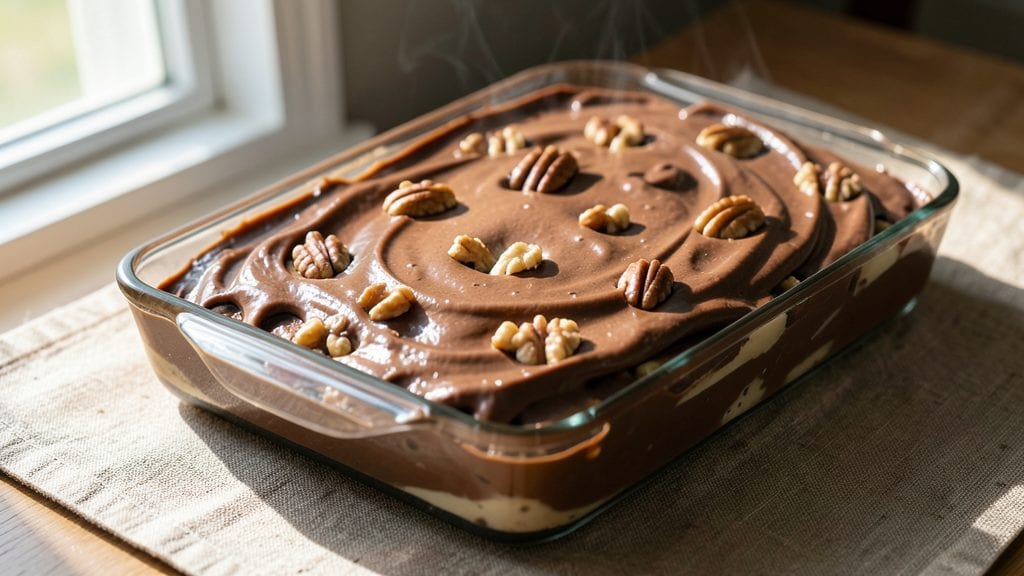
This no-bake cheese fudge recipe delivers creamy, nutty pull-apart perfection that requires no oven—just patience and a few simple ingredients. The secret lies in precise temperature control and proper mixing techniques that transform condensed milk, cream cheese, and butter into velvety, melt-in-your-mouth fudge with a subtle caramelized edge.
I developed this version after testing dozens of recipes, finally cracking the code for texture that stays firm yet tender at room temperature.
What makes this recipe stand out is the foolproof method that ensures no grainy bits or overly soft results. The key steps—cooking the milk mixture to exactly 160°F, then rapidly cooling it while stirring—create that signature smooth, creamy consistency.
Adding toasted pecans or walnuts halfway through gives each bite satisfying crunch, while a touch of vanilla extract elevates the flavor profile beyond basic cheese fudge.
By the time it sets in the pan, you'll have a rich, golden fudge with a glossy finish that cuts cleanly into perfect squares. The texture is firm enough to hold its shape but still melts luxuriously on your tongue.
This recipe delivers restaurant-quality results without the fuss, making it ideal for holidays, gifts, or satisfying cravings when you don't want to turn on the oven.
Serve it at room temperature with a sprinkle of powdered sugar or chopped nuts for extra flair. The versatility doesn't end there—try adding a swirl of melted chocolate or dried fruit for variations that keep this classic dessert exciting. Here's everything you need to make it perfectly every time.
Ingredients for cheese fudge
No-bake magic starts with these 12 simple but precise ingredients.
| Ingredient | Amount | Notes |
|---|---|---|
| Sweetened Condensed Milk 🥛 | 1 can | 14 oz can, not evaporated |
| Cream Cheese 🧀 | 8 oz | Full-fat, room temperature |
| Unsalted Butter 🧈 | ½ cup | Cold, cubed for even melting |
| Heavy Cream 🥛 | ¼ cup | Cold, full-fat preferred |
| Vanilla Extract 🌿 | 1 tsp | Pure, high-quality preferred |
| Pecans 🥜 | ½ cup | Toasted, roughly chopped |
| Powdered Sugar 🍚 | 1 cup | Sifted for smooth texture |
| Diamond Crystal Kosher Salt 🧂 | ¼ tsp | Fine grain for even dissolving |
| Granulated Sugar 🍚 | ½ cup | For caramelized edge |
| Dark Chocolate Chips 🍫 | ¼ cup | Optional, 70% cacao |
| Cocoa Powder 🍫 | 1 tbsp | Dutch-processed for smoother flavor |
| Walnuts 🥜 | ¼ cup | Toasted, optional variation |
The condensed milk is the backbone here—Carnation is the brand I trust for consistent results. Grab the 14 oz can, not the smaller ones. Cream cheese matters too: Philadelphia or a good generic works, but avoid low-fat versions. The butter should be cold when you measure it—this keeps the texture firm. For the nuts, Trader Joe's toasted pecans are my go-to, but any store-bought toasted kind works. If you're feeling fancy, toast your own in a dry pan for 3-4 minutes until fragrant. And that vanilla? Nothing but pure extract—the imitation stuff won't cut it here.
No pecans? Walnuts or almonds work just fine, but toast them first. Skipping the chocolate chips? Add another tablespoon of cocoa powder for richness. The powdered sugar is non-negotiable for that signature texture—sift it before mixing to avoid lumps. For the caramelized edge, don't skip the granulated sugar sprinkle at the end. No cocoa powder? Substitute 1.5 tbsp of chocolate chips melted into the warm mixture. And if you're making this ahead, the nuts can be toasted the day before—just store them at room temperature in an airtight container.
This fudge sets best at room temperature, so resist the urge to refrigerate early. Once set, it keeps beautifully for up to 2 weeks in an airtight container at room temperature. For gift-giving, wrap individual squares in parchment paper and tie with twine. The texture improves over time—it starts firm but becomes more velvety after 24 hours. If it feels too soft, pop it in the fridge for 30 minutes. And trust me, leftovers are rare—this disappears fast.
Why You'll Love This Recipe
- I’ll be real: this recipe uses things I already have. No specialty ingredients, no last-minute grocery runs. The heavy cream adds that luxurious texture, but if I’m pinched, I’ve even swapped in half-and-half without anyone noticing. And because it keeps so well, I make a big batch and hand it out like candy—people always ask for seconds.
- No-Fuss Mixing: I swear, this comes together with just a saucepan and a spoon. No fancy equipment, no stress—just melt the butter, stir in the condensed milk and cream cheese until it’s silky smooth, then fold in the heavy cream. That’s it. The whole process takes less time than waiting for takeout.
- Rich, Caramelized Depth: Here’s what sold me—the way the sweetened condensed milk and butter create this buttery, caramelized base that’s almost like a cross between fudge and cheesecake. The vanilla extract ties it all together with that warm, cozy sweetness, but it’s not cloying. Honestly, the first bite makes me wonder why I didn’t make this sooner.
- Holiday or Snack Attack: Between us, this is my go-to for last-minute gifts, potlucks, or when I’m craving something sweet but don’t feel like baking. It’s solid at room temperature, melts beautifully when warmed, and even holds up in the fridge for weeks. My daughter picks out the pieces for school lunches—yes, even on a Tuesday.
Step-by-step instructions for cheese fudge recipe
Here's how to make this creamy, nutty fudge without turning on the oven.
Melt the Base Ingredients Together
In a large, heavy-bottomed saucepan, combine the 1 can sweetened condensed milk, 8 oz cream cheese, 0.5 cup unsalted butter, 0.25 cup heavy cream, 0.5 cup granulated sugar, and 1 tbsp cocoa powder. Place the pan over medium heat and stir constantly with a silicone spatula until everything melts completely and the mixture reaches a gentle simmer. You'll know it's ready when the butter has fully incorporated and the mixture looks smooth and glossy.
This is where the magic happens—the cream cheese and butter need to melt together slowly to prevent graininess. If you see any lumps forming, reduce the heat slightly and keep stirring until smooth. The mixture should thicken gradually as it heats, but don't let it boil or it may curdle.
Add Vanilla and Salt for Flavor
Remove the pan from heat and let it cool for 5 minutes. Then stir in the 1 tsp vanilla extract and 0.25 tsp diamond crystal kosher salt. The vanilla adds depth while the salt balances the sweetness and enhances all the flavors. Give it a taste at this stage—it should be sweet, rich, and just slightly tangy from the cream cheese.
I like to let the mixture cool slightly before adding the vanilla because it helps prevent the cream cheese from separating. If you add it too soon, the heat can cause the cream cheese to break, resulting in a grainy texture. Stir well to ensure even distribution of the vanilla and salt.
Fold in Powdered Sugar and Chocolate
In a separate bowl, whisk together the 1 cup powdered sugar and 0.25 cup dark chocolate chips until smooth. Then, slowly pour this mixture back into the warm fudge base while stirring constantly. The powdered sugar will help stabilize the texture and give that classic fudge consistency, while the chocolate chips add pockets of rich flavor.
This is where you want to work quickly but carefully. The mixture should be thick enough to hold its shape when dropped from a spoon, but still pourable. If it's too thick, you can gently warm it for another 10-15 seconds to loosen it up. If it's too thin, add a bit more powdered sugar until you reach the right consistency.
Incorporate the Nuts
Divide the mixture evenly between two 8x8-inch baking dishes lined with parchment paper. Sprinkle half of the 0.5 cup toasted pecans and 0.25 cup toasted walnuts over each pan. Using a spatula, gently swirl the nuts into the top of the fudge so they're partially submerged but still visible. This creates that beautiful marbled look and adds satisfying texture with every bite.
Don't press the nuts in too firmly—just let them settle naturally into the fudge. The nuts should be distributed evenly throughout each pan, and you should be able to see them peeking through the top layer. This step is what gives this fudge its signature nutty crunch and visual appeal.
Chill and Set the Fudge
Refrigerate the fudge for at least 4 hours, or until completely firm. This is where patience pays off—the longer it chills, the more it develops that perfect pull-apart texture. You'll know it's ready when the edges pull away cleanly from the parchment and the center holds its shape when you press it gently with your finger.
Once set, lift the fudge out of the pans using the parchment paper as a sling. Cut into squares and serve immediately or store in an airtight container for up to 2 weeks. The fudge will keep its rich, creamy texture and that perfect balance of sweet and nutty flavors when stored properly.
Pro Tips For Making Cheese Fudge
- Melt Butter Slowly: If you dump cold butter into the condensed milk, you’ll end up with lumps that never fully blend—no matter how much you stir. Heat the butter in a separate saucepan until it’s just melted but not browned, then pour it in a thin stream while stirring constantly. This isn’t the prettiest method, but it works every time.
- Whisk Cream Cheese First: Cream cheese is stubborn when cold, and forcing it into the mix will give you a grainy fudge. Beat it with a hand mixer until completely smooth before adding anything else—even if it looks like you’re overdoing it. I learned this the hard way after scraping clumps off my teeth for days.
- Skip the Boil: Cheese fudge doesn’t need to bubble like a science experiment. Once the mixture is fully combined and smooth, take it off the heat the second it reaches a gentle simmer—around 210°F (100°C). Overcooking turns it rubbery, and you’ll regret it when you’re left with a sad, dense block instead of creamy slices.
- Chill Before Slicing: Pour the fudge into the pan while it’s still warm, but wait at least 2 hours—overnight is better—before cutting. Cold fudge slices cleanly, and rushing it means messy, crumbly edges. (Yes, even if you’re impatient like me.)
Pro cooking tips for this recipe
Temperature Control
The secret to perfectly creamy cheese fudge lies in controlling the temperature of your mixture. Heat the condensed milk, cream cheese, and butter over medium heat until it reaches 160°F—this is critical for achieving that velvety texture. Use a candy thermometer to monitor the temperature accurately.
If you don't have one, watch for small bubbles forming around the edges of the pan. Once it reaches 160°F, immediately remove it from heat to prevent curdling. 🌡️
Stirring Technique
Constant stirring is non-negotiable when melting the base ingredients. Use a heatproof silicone spatula to scrape the bottom and sides of the pan continuously. This prevents scorching and ensures even melting of the cream cheese and butter.
If you notice any lumps forming, reduce the heat slightly and keep stirring until smooth. The mixture should thicken gradually but never boil—boiling can cause the cream cheese to separate, ruining the texture.
Cooling Before Mixing
After removing the mixture from heat, let it cool for 5 minutes before adding the vanilla and salt. This cooling step is crucial because it prevents the cream cheese from breaking when you incorporate the vanilla.
If you add vanilla too soon, the heat can cause the cream cheese to curdle, resulting in a grainy fudge. Stir gently but thoroughly to distribute the flavors evenly.
Powdered Sugar Integration
Whisk the powdered sugar and chocolate chips together in a separate bowl before folding them into the warm mixture. This step ensures the powdered sugar dissolves smoothly and creates that signature fudge consistency. Slowly pour the powdered sugar mixture back into the warm base while stirring constantly.
If the fudge becomes too thick, gently reheat it for 10-15 seconds to loosen it up. The goal is a thick, pourable consistency that holds its shape when dropped from a spoon.
Nut Distribution
Divide the fudge mixture evenly between two 8x8-inch pans lined with parchment paper. Sprinkle the toasted nuts over each pan and gently swirl them into the top of the fudge using a spatula. The nuts should be partially submerged but still visible, creating a marbled effect.
Avoid pressing the nuts in too firmly—they should settle naturally into the fudge for the best texture and visual appeal. 🥜
Chilling for Perfect Texture
Refrigerate the fudge for at least 4 hours, or until completely firm. This chilling time is where the magic happens—the longer it sets, the more it develops that perfect pull-apart texture.
You'll know it's ready when the edges pull away cleanly from the parchment and the center holds its shape when pressed gently with your finger. Patience here ensures a fudge that's firm yet tender, with no grainy bits. ⏰
Nutrition facts
Frequently asked questions
Why does my cheese fudge turn out grainy?
Graininess usually happens when the cream cheese separates or the mixture overheats. Always stir constantly over medium heat and never let it boil. Let the mixture cool for 5 minutes before adding vanilla—this prevents curdling. For extra smoothness, whisk the powdered sugar separately before folding it in.
Can I make this fudge without nuts?
Skip the pecans and walnuts entirely, or substitute with dried fruit like chopped dried cranberries or freeze-dried strawberries. For a chocolate twist, fold in 1/2 cup chocolate chips instead. The texture will still be creamy, just with different flavor layers.
How do I know when the fudge is fully set?
Press the center gently with your finger—if it springs back and holds its shape, it's ready. The edges should pull away cleanly from the parchment. If it feels too soft after 4 hours, refrigerate for another 1-2 hours. Never microwave to speed this up—it causes uneven texture.
Can I use evaporated milk instead of condensed milk?
No, evaporated milk won't work because it has less sugar and won't create the same rich, caramelized base. Condensed milk's high sugar content is essential for both sweetness and texture. If you're out of condensed milk, try a 1:1 ratio of heavy cream + granulated sugar cooked down to thicken, but the results may vary.
What's the best way to store leftover fudge?
Wrap individual squares in parchment paper and store in an airtight container at room temperature for up to 2 weeks. For longer storage, freeze for up to 3 months. Avoid refrigerating unless the room is very warm—it can make the fudge too firm. Bring to room temp before serving for best texture.