
Appetizers
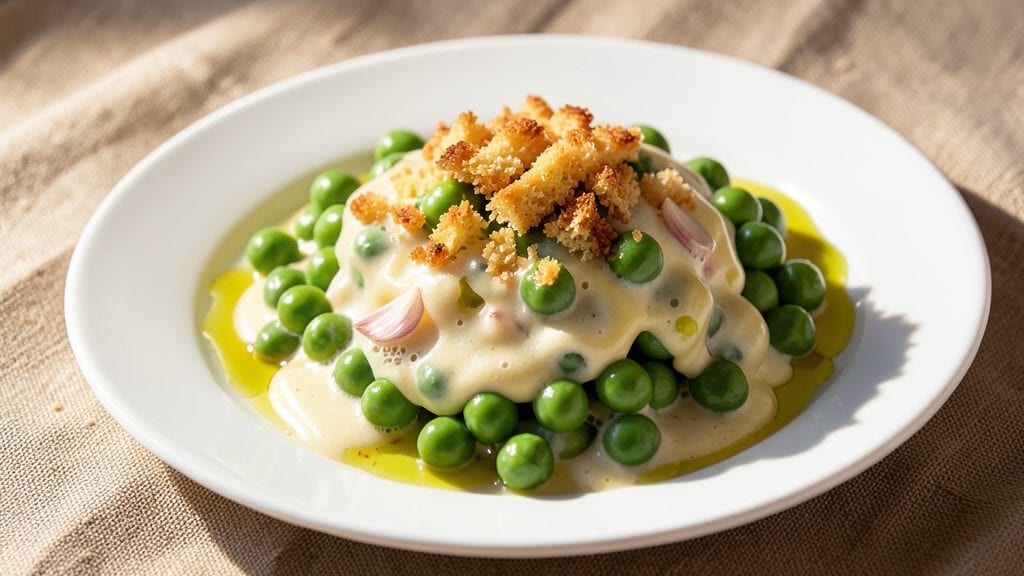
This cheese peas recipe transforms humble garden peas into a crispy, golden crown of breadcrumbs resting over a pool of melted, pull-apart cheese goodness. The secret lies in the contrast—crunchy top meets creamy, cheesy center—creating a dish that’s equal parts comforting and sophisticated.
I developed this after realizing how often peas get overlooked as a side dish, and now it’s my go-to for vegetarian appetizers or light main courses.
The magic happens in two stages: first, tender peas simmer in a light garlic-herb broth until just bright green, then they’re topped with a crispy breadcrumb mixture that bakes into a perfect golden crust.
A blend of sharp cheddar and Gruyère melts into a stretchy, gooey layer that pulls apart with every bite. This isn’t your childhood mushy pea casserole—it’s a restaurant-worthy dish that still feels easy enough for weeknight cooking.
By the time it emerges from the oven, you’ll have a dish that’s visually stunning—golden, bubbling, and impossible to resist. The aroma of toasted breadcrumbs and melted cheese will fill your kitchen, while the texture contrast delivers satisfaction in every bite.
Serve it as an appetizer to impress guests or as a light main course with a crisp salad. Here’s how to make it foolproof.
For extra flavor, stir in a pinch of smoked paprika or fresh thyme into the breadcrumb topping, or swap the cheddar for a vegan alternative if needed. The versatility makes it perfect for meal prep or last-minute entertaining. Let’s get cooking!
Ingredients for cheese peas
Fresh peas, sharp cheddar, and crispy breadcrumbs—this vegetarian masterpiece delivers restaurant-quality texture contrast.
| Ingredient | Amount | Notes |
|---|---|---|
| Fresh Garden Peas 🌿 | 2 cups | Shelling pod preferred, bright green |
| Sharp White Cheddar Cheese 🧀 | 1 ½ cups | Freshly grated, block preferred |
| Gruyère Cheese 🧀 | ¾ cup | Freshly grated, nutty flavor |
| Panko Breadcrumbs 🍞 | 1 cup | Light and crispy texture |
| Extra-Virgin Olive Oil 🫒 | ¼ cup | For crispy breadcrumbs |
| Fresh Garlic Cloves 🧄 | 2 cloves | Minced, aromatic base |
| Fresh Thyme Leaves 🌿 | ½ tbsp | Chopped, earthy aroma |
| Vegetable Broth 💧 | ½ cup | Low-sodium preferred |
| Diamond Crystal Kosher Salt 🧂 | ½ tsp | Fine grain for seasoning |
| Ground Black Pepper 🌶️ | ¼ tsp | Freshly ground preferred |
| Smoked Paprika 🌶️ | ½ tsp | For subtle smokiness |
| Unsalted Butter 🧈 | 2 tbsp | Melted for richness |
The Gruyère is non-negotiable here—its nutty depth transforms this into something special. Look for a wedge at Whole Foods or specialty cheese shops—pre-shredded loses flavor fast. The panko should be light and airy (none of that dense stuff), and Trader Joe's carries the best. Fresh peas? Frozen works in a pinch, but nothing beats the bright green snap of fresh. If you're using frozen, don't thaw them—they'll get mushy. The thyme matters too: Harvest Gourmet sells dried thyme that's more potent than grocery store brands.
No Gruyère? Parmesan at half the amount gives you a similar umami punch. Short on panko? Toasted breadcrumbs from a baguette work—just pulse them in a food processor for finer texture. The smoked paprika can be swapped for regular paprika, but Penzeys carries a great smoky variety if you want to splurge. Vegetable broth? Low-sodium is key—most store brands have too much salt. Need a vegan option? Nutritional yeast adds cheesiness to the breadcrumb mix. The butter? Full-fat only—low-fat won't give you that rich, melted goodness.
Peas keep best in the fridge for 3-4 days after shelling—store them in a sealed container with a damp paper towel to maintain freshness. The breadcrumb topping stays crispy for 2 days if stored in an airtight container, but honestly, it's better reheated fresh from the oven. For meal prep, assemble the dish, refrigerate overnight, then bake straight from cold—10-15 minutes extra at 375°F. The cheese gets even gooier this way, and the breadcrumbs crisp up perfectly.
Why You'll Love This Recipe
- No-Fuss Prep: I’ll be real—this recipe takes less time than waiting for takeout. Toss those fresh peas into a pan, melt the cheddar and Gruyère together, then top with panko. Five minutes of hands-on work, and the rest is just letting flavors marry.
- Umami Bomb: That sharp white cheddar and nutty Gruyère combo? It’s like a flavor hug for your taste buds. The panko adds a crunch that cuts through the creamy cheese—every bite is rich, salty, and just a little addictive.
- Lunchbox Hero: Between us, these are my go-to for packed lunches. The peas hold up well, and the cheese stays melty (if you reheat them right). Add a sprinkle of flaky salt, and suddenly you’ve got a meal that feels fancy but costs next to nothing.
- Budget Stretch: I buy frozen peas when fresh ones are pricey, and the cheeses stretch far. A single batch feeds four, and leftovers reheat beautifully—no sad, rubbery peas here. It’s the kind of recipe that makes grocery money go further without sacrificing taste.
Step-by-step instructions for crispy cheese peas with breadcrumb crown
Here's how to create that irresistible contrast of golden breadcrumb crowns over creamy, melty cheese pea filling—every bite is pure indulgence.
Prepare the Pea and Cheese Filling
In a medium saucepan, combine the 2 cups fresh garden peas with the 0.5 cup vegetable broth. Bring to a gentle simmer over medium heat and cook for 5-6 minutes until the peas are tender but still vibrant green. You'll know they're perfect when they just begin to soften at the edges but still hold their shape.
While the peas cook, in a small bowl, mix together the 1.5 cups sharp white cheddar cheese and 0.75 cup gruyère cheese. Grate them freshly if possible—the finer the texture, the smoother the final filling. Once the peas are tender, remove the saucepan from heat and stir in the cheese mixture until completely melted and creamy. The filling should be smooth with no visible cheese chunks. Season immediately with 0.5 tsp diamond crystal kosher salt, 0.25 tsp ground black pepper, and 0.5 tsp smoked paprika. Let it cool slightly while you prepare the breadcrumb crowns.
Create the Crispy Breadcrumb Crown
In a small mixing bowl, combine the 1 cup panko breadcrumbs, 0.25 cup extra-virgin olive oil, 2 cloves minced fresh garlic cloves, 0.5 tbsp chopped fresh thyme leaves, 0.25 tsp ground black pepper, and 0.5 tsp smoked paprika. Use your fingers to gently mix until every breadcrumb is evenly coated and glistening with oil. The mixture should look like wet sand with visible garlic flecks.
Spread the breadcrumb mixture evenly on a parchment-lined baking sheet, pressing down lightly with the back of a spoon to create an even layer. Bake at 375°F for 8-10 minutes, stirring once halfway through, until the breadcrumbs are deep golden brown and crispy. Watch carefully—they crisp up quickly and can burn if left unattended. Remove from oven and let cool slightly while you prepare the final assembly.
Assemble and Bake to Golden Perfection
Preheat your oven to 350°F. Lightly grease a small baking dish or ramekin with 2 tbsp melted unsalted butter—this ensures easy release later. Spoon the pea and cheese filling into the prepared dish, spreading it evenly to create a smooth base. The filling should be about ½-inch thick in the dish.
Sprinkle the cooled breadcrumb mixture evenly over the top, pressing down gently to create an even crown. The breadcrumbs should completely cover the cheese filling with a ¼-inch thick layer. Bake for 12-15 minutes until the breadcrumb crown is deep golden brown and the cheese filling is bubbling around the edges. The center should still be slightly soft when you press gently with a spoon.
Finish with Melted Cheese Magic
Remove from the oven and let rest for 5 minutes—this crucial resting period allows the filling to set slightly while the breadcrumb crown maintains its crisp texture. For the grand finale, sprinkle an additional 2 tablespoons freshly grated sharp white cheddar cheese over the top and return to the oven for 2-3 minutes until the cheese melts and creates a beautiful golden crust.
Serve immediately while the breadcrumb crown is still crisp and the cheese filling is gloriously gooey. The contrast of temperatures and textures makes every bite unforgettable—crunchy, golden crown giving way to creamy, melty cheese pea center. This dish shines as a main course or elegant appetizer, perfect for impressing guests or treating yourself to something truly special.
Pro Tips For Making Cheese Peas
- Shock the Peas First: Toss fresh peas in ice water for 10 seconds before draining—this stops cooking and keeps them vibrant. I used to skip this and ended up with mushy, sad peas that turned to paste under the cheese’s heat.
- Grate Cheese Coarse: Use a box grater for sharp white cheddar and Gruyère—smaller crumbles melt into a gooey mess instead of crisp pockets. My grandmother swore by this, and she was right: the texture stays just firm enough to bite into.
- Toast Panko Dry: Heat the panko in a dry pan over medium-low for 2–3 minutes until golden and fragrant before adding oil. This removes moisture so it crisps up properly—no more soggy, flavorless breadcrumbs clinging to your peas.
- Salt the Oil: Season the olive oil with a pinch of salt before toasting the panko—it distributes flavor evenly and cuts through the richness of the cheeses. Sounds weird, but it works: the crust tastes deeper and more balanced.
Regional styles of these flavors
French Pea and Gruyère
In France, peas are often elevated with rich, nutty Gruyère—a perfect match for this recipe. I love how the French approach peas as a luxurious side dish, often pairing them with crème fraîche or crispy fried shallots.
For a French-inspired twist, swap the cheddar for 100% Gruyère and add 1 tbsp chopped chives to the breadcrumb mix. Serve with a dry white wine like Sancerre to cut through the richness. 🍷
Italian Parmigiano-Reggiano Twist
Southern Italy turns peas into a creamy, cheesy delight called piselli e formaggio. Replace the Gruyère with ½ cup grated Parmigiano-Reggiano and add 1 tsp dried oregano to the breadcrumb mix.
The Italians often finish with a drizzle of extra-virgin olive oil and a sprinkle of flaky sea salt. This version pairs beautifully with garlic bread or a simple Caprese salad. 🧀
British Cheesy Pea Casserole
The British love their cheesy pea dishes, often baked in a single dish with a buttery breadcrumb topping. For an authentic British touch, add ½ cup heavy cream to the pea filling and top with 2 tbsp grated mature cheddar mixed into the breadcrumbs.
Many British recipes call for Marmite (a yeast extract spread) for depth—add ½ tsp to the pea broth for that unmistakable savory note. Serve with crusty soda bread for a cozy meal. 🇬🇧
American Southern Comfort
In the American South, cheesy peas often get a smoky, spicy kick. Add ½ tsp cayenne pepper and 1 tsp smoked paprika to the breadcrumb mix for heat, then top with crumbled bacon before baking.
Southern cooks often serve this with cornbread or collard greens. For extra richness, stir 2 tbsp cream cheese into the pea filling before baking. 🌶️
Vegan Cheese Alternative
For a plant-based version, replace the dairy cheeses with ½ cup vegan mozzarella shreds (like Miyoko's) and ½ cup cashew cream (blend 1 cup soaked cashews with ¼ cup water). Use nutritional yeast in the breadcrumb mix for that cheesy flavor.
This version works beautifully with a smoky BBQ dipping sauce made from tomato paste, apple cider vinegar, and liquid smoke. 🌱
Mexican-Inspired Queso Peas
Give this dish a Mexican flair by adding ½ cup diced roasted poblano peppers and ¼ cup chopped cilantro to the pea filling. Top with a mix of ½ cup cotija cheese and ½ cup crushed tortilla chips instead of breadcrumbs.
Bake until the cheese melts and the chips crisp. Serve with warm corn tortillas and salsa verde for dipping. 🌶️
Nutrition facts
Frequently asked questions
Can I use frozen peas instead of fresh?
Yes, but with one key adjustment: do not thaw them first. Simply use 2 cups frozen peas straight from the freezer in the same recipe. They'll release moisture as they cook, so reduce the vegetable broth to ¼ cup instead of ½ cup to prevent a watery filling. The texture will be slightly different but still delicious!
What's the best way to make this dish vegan?
Replace the dairy cheeses with ½ cup vegan mozzarella shreds (like Miyoko's) plus ½ cup cashew cream (blend 1 cup soaked cashews with ¼ cup water). For the breadcrumb mix, use nutritional yeast instead of cheese. The result is still creamy and flavorful, with that satisfying cheesy taste!
Why did my breadcrumb topping get soggy?
This usually happens when the breadcrumbs absorb too much moisture from the cheese below. To prevent it, make sure your breadcrumb mixture is fully crisped before adding it to the cheese filling. Also, try baking the assembled dish at 375°F instead of 350°F for the final 5 minutes to help crisp it up again. A sprinkle of extra panko on top before baking can also help!
Can I make this ahead of time?
Assemble the dish completely (with the breadcrumb topping) and refrigerate overnight. When ready to bake, add 10-15 extra minutes at 375°F to ensure the breadcrumbs crisp properly. The cheese will get even gooier after resting, and the flavor develops beautifully. Just avoid pre-baking the breadcrumb topping—make it fresh before assembly!
What's the best cheese substitute if I can't find Gruyère?
Use ½ cup grated Parmesan for a similar nutty depth, or swap the Gruyère completely with 1 cup extra-sharp cheddar. For a creamier texture, try ½ cup cream cheese blended into the pea filling. Each option will give a slightly different flavor profile, but all work wonderfully!