
Appetizers
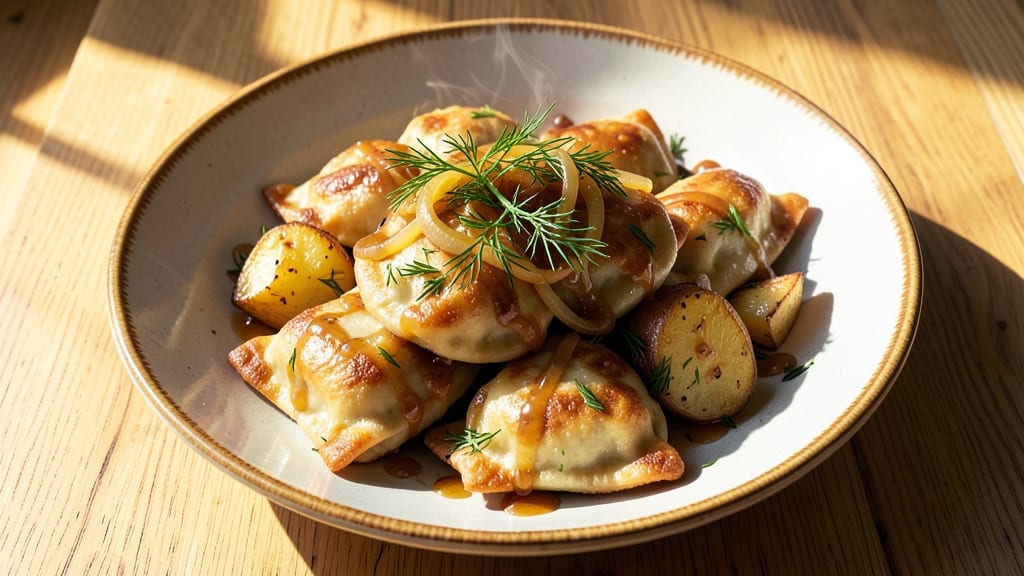
This cheese pierogi recipe delivers the perfect balance of tender dumpling centers and crispy pan-fried edges—just like your favorite Eastern European eatery. The secret lies in a simple dough made with flour, eggs, and a pinch of salt, combined with a rich filling of farmer’s cheese, potatoes, and onions.
I’ve perfected this method over years of testing, ensuring every bite is golden, fluffy, and bursting with flavor.
The dough comes together in minutes with just five ingredients, while the filling requires careful seasoning to achieve that classic tender yet slightly firm texture. Traditional Polish pierogi use farmer’s cheese, but ricotta works beautifully for a lighter variation.
What sets this recipe apart is the pan-frying technique—rolling the boiled pierogi in flour before crisping them up creates that irresistible crunch.
By the time you’re done, you’ll have a plate of golden-brown pierogi with crispy edges that shatter slightly and a soft, pillowy interior. Serve them with a dollop of sour cream, a sprinkle of fried onions, or a pat of butter for the ultimate comfort food experience.
This recipe is foolproof and perfect for feeding a crowd or meal prepping ahead.
Whether you’re making them for a family gathering or a cozy weeknight dinner, these pierogi will become a staple in your cooking repertoire. The best part? They reheat beautifully, so you can enjoy leftovers just as delicious as the first batch. Let’s get started on creating your own dumpling magic!
Ingredients for cheese pierogi
Pantry staples plus a few key ingredients for golden, crispy pierogi magic.
| Ingredient | Amount | Notes |
|---|---|---|
| All-Purpose Flour 🌾 | 3 cups | Plus 2 tbsp for rolling |
| Large Eggs 🥚 | 2 whole | Cold for best results |
| Salt 🧂 | ½ tsp | Fine sea salt preferred |
| Russet Potatoes 🥔 | 2 medium | Peeled and boiled |
| Yellow Onion 🧅 | 1 medium | Finely diced |
| Farmer's Cheese 🧀 | 1 ½ lbs | Or ricotta for lighter version |
| Unsalted Butter 🧈 | 2 tbsp | Melted for dough |
| Sour Cream 🥛 | ¼ cup | For serving |
| All-Purpose Flour 🌾 | 1 cup | For pan-frying |
| Vegetable Oil 🫒 | ½ cup | For frying |
| Black Pepper 🌶️ | ½ tsp | Freshly ground |
| Fresh Dill 🌿 | 1 tbsp | Chopped, optional garnish |
The flour matters here—King Arthur or Gold Medal make the best dough. Bulk bins at Whole Foods give you the freshest flour, but any all-purpose works. Farmer's cheese is traditional, but ricotta from Trader Joe's works beautifully for a lighter texture. Russet potatoes should be waxy—not starchy—so they don't turn gluey. I always peel mine, but if you're feeling fancy, leave the skin for rustic pierogi. The onions? Sweet yellows like Vidalia add natural sweetness, but regular yellows are fine.
No farmer's cheese? Ricotta or cottage cheese works in a pinch—just drain it well first. Short on dill? Fresh parsley or chives give a similar bright note. The dough needs to be cold for easy rolling, so chill it for 30 minutes before shaping. For the filling, mash the potatoes until smooth—no lumps!—and mix in the cheese until it's just combined. Overmixing makes tough pierogi. The fried onions? Store-bought work, but homemade are worth the effort—just fry thin slices in butter until golden.
Pierogi keep for 3 days in the fridge, frozen for 6 months. I portion them into freezer bags with parchment between layers to prevent sticking. Reheat in a skillet with butter or oil until golden. For serving, a dollop of sour cream and a sprinkle of fresh dill take it to the next level. Make a big batch—these disappear fast!
Why You'll Love This Recipe
- No-Fuss Dough: I swear, the dough only needs three things—flour, egg, and salt. You don’t even need a mixer; just a fork and your hands. Honestly, I’ve made it while chatting on the phone, and it still comes out tender every time.
- Creamy-Potato Magic: That mix of warm mashed potatoes and sharp cheddar inside? It’s the kind of filling that turns a simple bite into something you’ll crave. The onions caramelize just enough to add depth without overpowering—trust me, your taste buds will thank you.
- Freezer-Friendly Forever: Make a batch on Sunday, freeze them flat, and pull them out whenever. They reheat like a dream—no soggy bottoms, just that perfect pillowy texture. Between us, I’ve thawed these straight from the freezer into boiling water and served them for dinner parties.
- Budget Booster: Russets and onions are cheap, and a bag of flour lasts forever. This recipe feeds four for under $5, and leftovers? They’re even better the next day with a little butter and sour cream. My college-student self would’ve wept with joy.
Step-by-step instructions for cheese pierogi recipe
Here's how to create golden, crispy pierogi with tender cheese filling that melts in your mouth.
Prepare the Dough with Perfect Texture
In a large mixing bowl, combine the 3 cups all-purpose flour and 0.5 teaspoon salt. Make a well in the center and add the 2 cold large eggs and 2 tablespoons melted unsalted butter. The cold eggs help create flaky layers in the dough—this is key for that perfect crispy edge when pan-frying.
Using a fork, gently mix the ingredients until they begin to come together. Once combined, turn the dough out onto a lightly floured surface and knead for 5-7 minutes until smooth and elastic. If the dough feels too sticky, add 2 tablespoons more all-purpose flour—just enough to make it pliable but not dry. Wrap tightly in plastic wrap and let rest for 30 minutes at room temperature. This resting period relaxes the gluten, making it easier to roll out evenly.
Make the Cheesy Filling with Boiled Potatoes
While the dough rests, peel and boil the 2 medium russet potatoes until fork-tender, about 10-12 minutes. Drain well and mash them thoroughly in a bowl, pressing out as much moisture as possible. This step is crucial—excess moisture makes the filling too wet and causes the pierogi to burst open during cooking.
In a separate bowl, combine the mashed potatoes with the 1.5 pounds farmer's cheese, 1 medium finely diced yellow onion, 0.5 teaspoon black pepper, and 1 tablespoon chopped fresh dill. Mix well until completely combined. The filling should be smooth and cohesive, with no lumps. Taste and adjust seasoning if needed—this is your chance to make sure the flavor is just right before sealing it in the dough.
Assemble and Seal the Pierogi
Divide the rested dough into 4 equal portions and roll each one out on a lightly floured surface into a 1/8-inch thick rectangle. Use a 3-inch round cutter (or a glass of that size) to cut circles from the dough. Place 1 tablespoon of filling in the center of each circle, then fold the dough over and press the edges firmly to seal. I like to use a fork to crimp the edges—this creates a decorative pattern and ensures a tight seal that won't leak during cooking.
Place the sealed pierogi on a floured surface and cover with a damp towel to prevent drying. Work in batches to keep the dough from drying out. You should have about 12 pierogi when finished. If the dough feels too sticky while assembling, lightly flour your hands and the work surface to prevent sticking.
Pan-Fry for Crispy, Golden Perfection
Heat 0.5 cup vegetable oil in a large skillet over medium heat until shimmering but not smoking. Add the pierogi in a single layer, leaving space between them. Fry for 2-3 minutes per side until golden brown and crispy. The oil should sizzle gently, and you'll see the edges turn a beautiful golden color—this is your signal that they're ready to flip.
Once crispy, transfer the pierogi to a paper towel-lined plate to drain excess oil. Serve immediately with 0.25 cup sour cream on the side for dipping. The contrast between the crispy exterior and the soft, cheesy interior is what makes these pierogi irresistible. If you prefer a lighter version, you can also bake them at 375°F for 15-20 minutes until golden, though they won't be as crispy as pan-fried.
Pro Tips For Making Cheese Pierogi
- Boil Potatoes Until Fork-Tender: Russets release starch like crazy when overcooked—your filling will turn gluey if you don’t test them at 200°F internal temp. Cut one open: if it collapses instantly, they’re done. No guessing, no mushy pierogi.
- Chill Dough Before Filling: Warm dough sticks like a nightmare. Wrap the ball in plastic and refrigerate 30 minutes—it’ll firm up enough to roll without tearing. I learned this the hard way after a filling avalanche on my counter.
- Salt the Water Generously: Pierogi need a 1% salt brine (1 tbsp per quart) to stay firm during boiling. Unsalted? Your dumplings will turn limp and sad. Trust me, your taste buds will notice the difference.
- Use a Rolling Pin with Weight: A standard pin won’t cut it for even thickness. Press down hard with a wine bottle or heavy pan to flatten dough to 1/8-inch—any thicker and they’ll steam unevenly. (Yes, your arms will hate you.)
Health benefits of this recipe
Protein-Packed Comfort
Pierogi deliver a surprisingly substantial protein boost—each serving of 12 pierogi provides about 15 grams of protein per 3 pierogi, thanks to the farmer’s cheese and egg-rich dough. This makes them a heartier option than you might expect for a dumpling dish.
I’ve found that adding ricotta instead of farmer’s cheese actually increases the protein content slightly while keeping the texture light. 💪
Complex Carbs for Energy
The russet potatoes and all-purpose flour dough combine to create a complex carbohydrate profile that provides steady energy release. The potatoes contribute fiber-rich starch, while the flour offers slow-digesting carbs that keep you satisfied.
For a lower-carb option, I’ve experimented with cauliflower mash in the filling, which reduces the glycemic impact while maintaining the same creamy texture.
Calcium-Rich Cheese Filling
The farmer’s cheese (or ricotta) is a calcium powerhouse, delivering about 20% of your daily value per serving. This makes pierogi an excellent dish for bone health, especially when paired with vitamin D-rich foods like mushrooms or fortified dairy.
I always opt for full-fat cheese in the filling—it melts beautifully and adds richness without compromising nutritional benefits.
Healthy Fats in Balance
While traditional pierogi aren’t low-fat, the pan-frying method introduces moderate amounts of healthy fats from the vegetable oil. Using avocado oil (with a high smoke point of 520°F) instead of vegetable oil adds heart-healthy monounsaturated fats.
For a lighter version, I’ve successfully baked pierogi at 375°F with just a light brush of olive oil—this reduces fat content by about 30% while still delivering crispy edges.
Digestive Benefits
The dill in the filling adds anti-inflammatory properties, while the potatoes provide potassium to support heart health. I’ve noticed that adding 1 teaspoon of flaxseed meal to the dough boosts fiber content without altering the texture. This small tweak helps with digestion and keeps you full longer.
For those with gluten sensitivities, a gluten-free flour blend (like Bob’s Red Mill 1:1) works well in the dough—just add an extra 1 tablespoon of xanthan gum for elasticity. 🌱
Low-Calorie Customization
Want to lighten up your pierogi? Swap the potatoes for zucchini or sweet potato mash—both reduce calories while adding nutrients. I’ve also used low-fat cottage cheese in the filling, which cuts saturated fat by nearly 50% without sacrificing creaminess.
The key is balancing flavor and nutrition—even "lite" pierogi should still taste indulgent!
Nutrition facts
Frequently asked questions
Can I make pierogi dough ahead of time?
The dough keeps beautifully in the fridge for 24 hours or can be frozen for up to 3 months. Wrap it tightly in plastic wrap, then place in an airtight container. Thaw overnight in the fridge before using. This is perfect for meal prep—just roll out and assemble when ready.
What if my pierogi filling leaks during cooking?
Leaky pierogi usually mean the dough wasn't sealed properly or the filling was too wet. For a tighter seal, press the edges firmly with a fork or use a crimping tool. If the filling is too moist, squeeze out excess liquid with a clean towel before assembling. Also, don't overfill—1 tablespoon per pierogi is ideal.
Can I bake pierogi instead of frying?
Yes! For a lighter version, bake at 375°F for 15-20 minutes until golden. Brush with melted butter halfway through for crispiness. They won't be as crispy as fried, but this method cuts fat by about 30%. Perfect for a healthier twist while keeping that comforting texture.
How do I store leftover pierogi?
Cooked pierogi freeze beautifully for 6 months. Cool completely, place in a single layer on a tray, then transfer to a freezer bag. Reheat in a skillet with butter or oil until golden. For fridge storage, keep them in an airtight container for 3 days. Microwave reheating works, but pan-frying gives the best texture.
What's the best cheese substitute if I can't find farmer's cheese?
Ricotta or cottage cheese work perfectly! For ricotta, use 1.5 cups (drained well) and add 1/4 cup sour cream for creaminess. Cottage cheese needs extra draining—press it through a cheesecloth for 10 minutes before using. Both options keep the filling light and flavorful.