
Main Courses
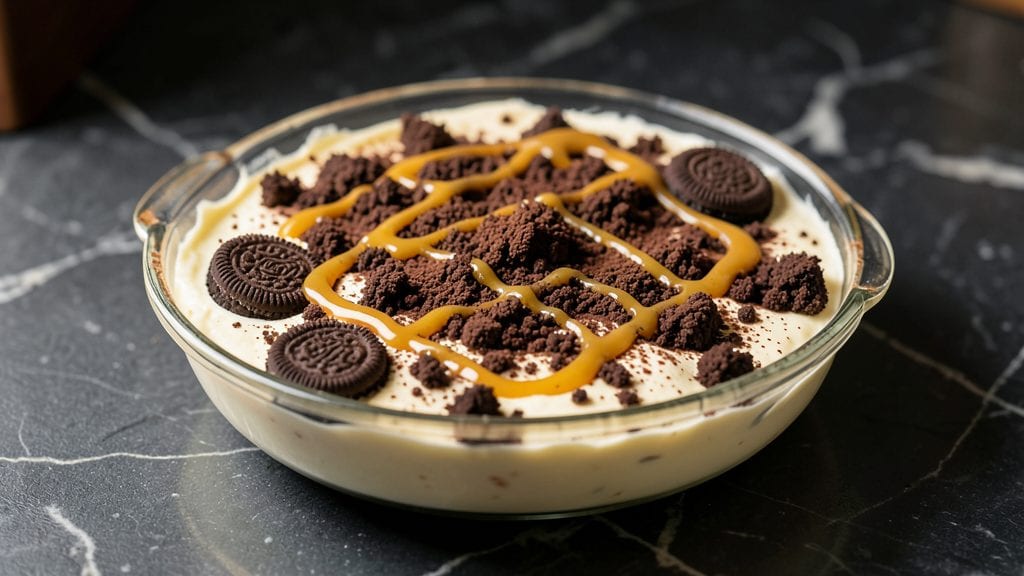
This vegan Oreo dirt pudding recipe delivers all the nostalgic crunch and chocolatey goodness without any cream cheese—just layers of crushed Oreos, silky coconut cream pudding, and whipped aquafaba topping.
The secret lies in balancing textures: a sturdy cookie crust, velvety chocolate pudding, and fluffy cloud-like whipped topping that mimics the classic version perfectly. I developed this after realizing how easy it is to recreate creamy desserts with plant-based ingredients, and trust me, nobody will guess it's dairy-free.
The beauty of this recipe is its simplicity—no baking required, just a few pantry staples and layering technique. You’ll start with a crushed Oreo crust pressed into a springform pan, followed by a rich chocolate pudding made from coconut cream and cocoa powder.
The magic happens when you top it with whipped aquafaba (chickpea brine), which creates light, airy layers that mimic whipped cream. It’s foolproof, with no risk of separation or soggy bottoms if you follow the assembly steps carefully.
What you end up with is a decadent, no-bake dessert that’s rich, crunchy, and satisfying—perfect for potlucks, holidays, or whenever you crave a classic treat without the dairy. The contrast between the crispy Oreo crust, creamy pudding, and fluffy topping makes every bite irresistible.
This version proves that plant-based desserts can be just as indulgent as the original, without sacrificing texture or flavor.
Serve chilled with extra Oreo crumbles on top or a sprinkle of cocoa powder for that restaurant-style finish. The best part? It takes less than 20 minutes to assemble, and the ingredients are likely already in your pantry. Let’s get started on this creamy, crunchy masterpiece!
Ingredients for oreo dirt pudding recipe without cream cheese
Pantry staples and a few specialty finds for this nostalgic vegan dessert masterpiece.
| Ingredient | Amount | Notes |
|---|---|---|
| Oreos (Classic Flavor) 🍪 | 3 cups | Crushed into fine crumbs |
| Full-Fat Coconut Cream 🥥 | 13 ½ oz | Chilled overnight for best results |
| Unsweetened Cocoa Powder 🍫 | ½ cup | Natural, not Dutch-processed |
| Aquafaba (Chickpea Brine) 🥫 | 1 cup | From canned chickpeas, drained |
| Granulated Sugar 🍚 | ¼ cup | White or raw cane sugar |
| Vanilla Extract 🌸 | 1 tsp | Pure, not imitation |
| Salt 🧂 | ¼ tsp | Fine sea salt preferred |
| Powdered Sugar 🍚 | ¼ cup | For dusting top layer |
| Dark Chocolate Chips (Vegan) 🍫 | ¼ cup | Melted for optional drizzle |
| Coconut Oil (Refined) 🥥 | 1 tbsp | For greasing springform pan |
| Lemon Juice 🍋 | 1 tsp | Freshly squeezed |
| Extra Oreos (Optional) 🍪 | ½ cup | Crushed for garnish |
The Oreos are the star—classic flavor only, no fillings or variations. Grab the big 14.3 oz can from Trader Joe's or Costco for the best price. The full-fat coconut cream is non-negotiable here—Goya or So Delicious brands work perfectly. Chill that can overnight before opening so the thick cream separates easily. For the cocoa powder, Hershey's Special Dark or Ghirardelli Natural gives the richest flavor. Aquafaba? Just drain and save the brine from your canned chickpeas—no need for specialty products. The sugar can be any kind, but organic cane sugar adds subtle caramel notes if you're feeling fancy.
No aquafaba? 1/4 cup corn syrup plus 1/2 tsp cream of tartar mimics the texture, though it won't be quite as light. Short on Oreos? Crushed vegan chocolate cookies work in a pinch, but they won't have that signature crunch. The cocoa powder can be Dutch-processed, but natural cocoa gives a deeper chocolate flavor. For the whipped topping, if you can't find full-fat coconut cream, soy cream or cashew cream works too—just add 1 extra tablespoon of powdered sugar. The lemon juice brightens everything, but white vinegar at half the amount works if you're out. And that powdered sugar? Confectioners sugar is ideal, but blended granulated sugar works in a bind.
This dessert keeps beautifully—5 days in the fridge sealed tightly. For the best texture, assemble it 4 hours ahead so flavors meld. The crust stays crispy if you press it firmly into the pan. Freeze for up to 2 months if you want to make it ahead—just thaw in the fridge overnight. Serve chilled, and trust me, extra Oreo crumbles on top make all the difference. The chocolate drizzle? Optional but worth it—melt those chips with a splash of coconut oil for a silky finish.
Why You'll Love This Recipe
- No Special Tools: Just a whisk and a bowl—no mixer, no fancy gadgets. I swear by the aquafaba trick here; it whips up like magic with just a hand whisk, and that coconut cream? Thickens the whole thing into a dreamy, crumbly texture without a single strainer in sight.
- Crunchy-Creamy Magic: That first bite—crunchy Oreos sinking into a pudding so rich it’s almost sinful. The cocoa powder deepens the flavor without tasting bitter, and the coconut cream makes it decadent, not heavy. Honestly, it’s the kind of dessert that makes you pause mid-bite.
- Party in a Cup: Bring this to potlucks, game nights, or even your own lazy Sunday—it’s single-serving friendly but still feels special. The aquafaba keeps it lighter than traditional versions, so no one will guess it’s secretly vegan (or secretly genius, depending on who you ask).
- Pantry Staple Hack: I make this when I’m out of cream cheese or just lazy. Coconut cream and Oreos? Always in my cupboard. Plus, leftovers? They last days in the fridge—just stir and enjoy, no reheating needed. Budget win, flavor win.
Step-by-step instructions for Oreo dirt pudding without cream cheese
Here's how to build this dreamy dessert with a crispy cookie crust and velvety chocolate layers.
Prepare the Crushed Oreo Crust
Place all 3 cups of Oreos (Classic Flavor) in a sealed plastic bag and crush them into fine crumbs using a rolling pin or heavy pan. You want the texture to resemble coarse sand—no large chunks remain. I like to pulse them briefly in a food processor for even consistency, then transfer back to the bag to shake out any clumps.
In a medium bowl, combine the crushed Oreos with 0.25 cup of granulated sugar and 1 tsp of vanilla extract. Mix well so every crumb gets coated in sweetness. This base will form the signature crunchy crust at the bottom of your pudding. Press this mixture firmly into a 6-inch springform pan lined with parchment paper, using the bottom of a measuring cup to create an even layer. Chill in the refrigerator while you prepare the filling.
Whip the Coconut Cream Mixture
Open the 13.5 oz of chilled full-fat coconut cream and scoop out only the thick, solid cream portion at the top (discard the watery part). In a large mixing bowl, whip this coconut cream with an electric mixer on high speed until it forms soft peaks. Add 1 cup of aquafaba (chickpea brine) and 1 tsp of lemon juice, then continue whipping until the mixture becomes thick and glossy—about 3-4 minutes.
In a separate small bowl, sift together 0.5 cup of unsweetened cocoa powder and 0.25 tsp of salt. Gradually fold this cocoa mixture into the whipped coconut cream, alternating with 0.25 cup of powdered sugar. Fold gently to maintain airiness—overmixing will deflate the texture. The batter should be smooth, thick, and hold its shape when spooned.
Assemble and Chill the Pudding
Pour the chocolate coconut mixture evenly over the chilled Oreo crust in the springform pan. Use a spatula to smooth the top, then gently press down to eliminate any air bubbles. Cover the pan tightly with plastic wrap and refrigerate for at least 4 hours—overnight is ideal. This long chilling time allows the layers to fully set and develop that perfect wobbly texture.
While it chills, prepare the optional garnish by crushing 0.5 cup of extra Oreos (Optional) into coarse crumbs. Melt 0.25 cup of dark chocolate chips (vegan) with 1 tbsp of refined coconut oil in a microwave-safe bowl in 20-second intervals, stirring between each interval until smooth. Drizzle this chocolate mixture over the chilled pudding before serving, then sprinkle with the crushed Oreos and a light dusting of powdered sugar.
Serve with Confidence
Run a knife around the edge of the springform pan to loosen the pudding, then carefully release the sides. Slide the parchment paper onto a serving plate for easy removal. The pudding should come out cleanly with the crust intact—a testament to your careful layering. Cut into 8 equal wedges for serving.
Each bite should deliver the perfect contrast: the crispy Oreo crust at the bottom, the creamy chocolate coconut layer in the middle, and the sweet garnish on top. Serve immediately while the texture is at its peak—this dessert doesn't improve with time. Store leftovers in an airtight container in the refrigerator for up to 3 days, though I doubt any will last that long!
Pro Tips For Making Oreo Dirt Pudding Recipe Without Cream Cheese
- Whisk Aquafaba Cold: I learned this the hard way—warm aquafaba loses volume when whipped, and your mousse will end up flat. Use chilled chickpea brine straight from the fridge, and whip it until stiff peaks form. If your bowl gets warm, pop it in the freezer for 2 minutes mid-whipping to reset the process.
- Toast Oreos Lightly: Skip the full baking sheet—just toast your crushed Oreos in a dry skillet over medium heat for 1-2 minutes until fragrant. This deepens their flavor without burning, and the edges won’t turn bitter like they do in the oven. (Yes, even if you’re impatient like me.)
- Chill Coconut Cream First: Full-fat coconut cream separates when cold, and that thick top layer is your secret weapon. Refrigerate the can overnight, scoop out just the solid cream (discard the watery part), and whip it into the mousse. No chilling? Use a bowl over ice while whipping—it’ll work, but not as smoothly.
- Dust Cocoa Last: Mixing cocoa powder into the wet ingredients too early can make the mousse grainy. Save a tablespoon to dust the top before serving—it’ll look like real dirt pudding, and the flavor hits fresh. (Your future self will thank you.)
Storing and reheating your leftovers
Fridge Storage Tips
Store your assembled Oreo dirt pudding in an airtight container with a lid to prevent moisture absorption. The crust stays crispy for up to 5 days when refrigerated at 40°F or below.
I use glass Pyrex containers because they seal tightly and don’t absorb odors. Always press the Oreo crust firmly into the pan before chilling—this prevents sogginess during storage. 🥫
Freezing for Later
For long-term storage, freeze the pudding in the same springform pan wrapped tightly with plastic wrap and aluminum foil. It keeps perfectly for up to 2 months without texture degradation.
Thaw overnight in the fridge before serving. I recommend freezing individual portions in ramekins if you want to serve smaller servings—just wrap each one separately. 🧊
Reheating (or Not)
This dessert is best served cold—reheating destroys the delicate textures. If you’ve stored it in the fridge, let it sit at room temperature for 10-15 minutes before serving to soften slightly.
For frozen pudding, thaw completely in the fridge to maintain the wobbly chocolate layer. Never microwave—it’ll turn grainy and lose its creamy consistency. ❄️
Reviving Texture
If the crust loses its crunch after storage, place the pudding on a wire rack over a baking sheet for 5 minutes before serving. This air circulation helps restore crispiness. For extra crunch, sprinkle fresh Oreo crumbles on top right before serving.
The aquafaba topping may separate slightly after freezing—just give it a quick whisk before serving to restore fluffiness. 💫
Portion Control
Use a serrated knife to cut clean wedges for individual servings. Store leftovers in small airtight containers to maintain freshness. I like to portion mine into 4-ounce containers for easy grab-and-go dessert. Label containers with the date—this helps track freshness and prevents freezer burn. 🍽️
Garnish Refresh
Before serving stored pudding, always add fresh toppings: melted chocolate drizzle, crushed Oreos, or a dusting of powdered sugar. These add visual appeal and mask any slight texture changes from storage. I keep a stash of extra toppings in my freezer for quick garnishes. 🍫
Nutrition facts
Frequently asked questions
Can I make this dessert without aquafaba?
Yes! If you don't have aquafaba, substitute with 1/4 cup corn syrup plus 1/2 tsp cream of tartar—whip it until stiff peaks form. For a lighter option, use 1/2 cup coconut whipped cream (like So Delicious brand) mixed with 1 tbsp powdered sugar. The texture won't be identical, but it'll still be creamy and delicious.
Why does my Oreo crust get soggy?
Soggy crusts happen when moisture seeps through before chilling. Press the Oreo mixture firmly into the pan and chill it for at least 30 minutes before adding the pudding layer. For extra insurance, place a parchment paper barrier between the crust and filling. This keeps the crunch intact even after chilling.
What's the best way to make this recipe kid-friendly?
Let the kids help crush the Oreos (supervised!) and sprinkle toppings. Use mini Oreos for a fun size variation, or shape the pudding into individual cups for easy serving. Serve with colorful sprinkles or a dollop of vegan whipped cream on top—it'll look like a dessert party!
Can I use store-bought pudding mix instead?
You can try, but homemade gives better texture. If you must use mix, choose a chocolate instant pudding and prepare it with coconut milk instead of dairy milk. Thin it slightly with 1 tbsp aquafaba to mimic the lightness of the coconut cream version. The crust will still be the star!
How do I fix if my pudding didn't set properly?
If the layers separated, gently fold the mixture again and return it to the fridge for 2-3 more hours. For a quick fix, top with extra whipped aquafaba or coconut whipped cream to cover any gaps. The Oreo crust will still provide structure, so don't worry—it'll still taste amazing!