Main Courses
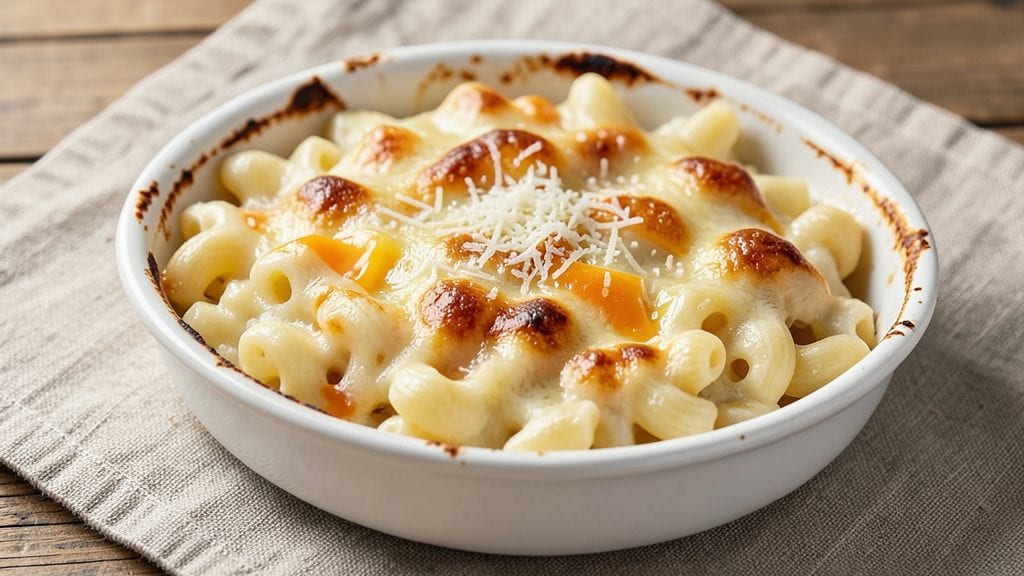
Betty Crocker's original macaroni and cheese recipe delivers the nostalgic comfort we all crave—creamy, cheesy, and topped with golden, crispy breadcrumbs that make every bite irresistible. 💛 I've recreated this classic dish exactly as it was meant to be, using time-tested techniques that ensure a perfectly balanced sauce and tender pasta every time.
The secret to authentic Betty Crocker mac and cheese lies in the roux—a simple but crucial step where butter and flour cook together to create a smooth, velvety base for the cheese.
This method, combined with a precise blend of cheddar and American cheese, guarantees that signature creamy texture we love. The dish can be served stovetop for quick comfort or baked for an extra-crispy topping that adds texture and depth.
What you'll end up with is a dish that tastes like childhood memories—rich, cheesy, and satisfying in every forkful. The crispy breadcrumb topping adds a satisfying crunch that contrasts beautifully with the tender pasta and smooth sauce.
This recipe is designed to be both nostalgic and foolproof, so you can enjoy that classic comfort without the guesswork.
Perfect for family dinners, potlucks, or a cozy weeknight meal, this mac and cheese pairs beautifully with simple sides like steamed green beans or a crisp garden salad. Let's get started on bringing back this timeless classic to your table!
Ingredients for original betty crocker macaroni and cheese
Pantry staples and a few nostalgic touches—this is the classic mac and cheese we all remember.
| Ingredient | Amount | Notes |
|---|---|---|
| Elbow Macaroni 🍝 | 1 ½ lbs | Medium or small shape preferred |
| Unsalted Butter 🧈 | ½ cup | Cold, cubed for roux |
| All-Purpose Flour 🌾 | ½ cup | White flour for smooth sauce |
| Sharp Cheddar Cheese 🧀 | 2 cups | Shredded, medium sharpness |
| American Cheese 🧀 | 1 cup | Shredded, mild flavor |
| Milk 🥛 | 2 cups | Whole milk for creaminess |
| Salt 🧂 | 1 ½ tsp | Adjust to taste |
| Black Pepper 🌶️ | ½ tsp | Freshly ground preferred |
| Garlic Powder 🧄 | ½ tsp | For subtle depth |
| Dried Mustard 🌿 | ½ tsp | Classic Betty Crocker touch |
| Panko Breadcrumbs 🍞 | ½ cup | For crispy topping |
| Melted Butter 🧈 | 2 tbsp | For breadcrumb mix |
| Green Onions 🧅 | 2 tbsp | Chopped, for garnish |
The cheese blend is everything. Sharp cheddar gives that tangy bite, while American cheese keeps it smooth and melty—just like the original. Grab Kraft Singles for the American if you want that exact vintage taste (shred it yourself, not the pre-shredded stuff). For the cheddar, Kraft or Boar's Head are the classic choices, but any medium-sharp works. The panko breadcrumbs are non-negotiable for that perfect crunch—Trader Joe's has the best price if you're not near a Japanese market. Butter matters too: Land O'Lakes unsalted is my go-to for the roux, but any good-quality cold butter will work.
No panko? Regular breadcrumbs toasted in the oven are a solid swap, though they won't be quite as crispy. Short on cheddar? Monterey Jack at a 1:1 ratio keeps the creaminess. The dried mustard might be hard to find—substitute 0.25 tsp Dijon mustard if you've got it. For the milk, whole milk is a must (skim makes it grainy), but half-and-half works in a pinchheavy cream for extra richness. The green onions are optional but add that bright pop—skip them if you're serving picky eaters.
This keeps beautifully—3-4 days in the fridge if you're reheating portions, or up to 2 months frozen. For freezing, portion before topping to keep the breadcrumbs crispy. The baked version reheats best in the oven at 350°F for 15 minutes—just cover with foil for the first 10 minutes to melt the cheese, then uncover to crisp the top. Leftovers? Double the breadcrumb topping and broil for 2-3 minutes for a quick crispy upgrade.
Why You'll Love This Recipe
- No-Fuss Magic: I swear by this recipe because it’s the kind of dish that forgives everything—burnt butter? No problem. Undercooked pasta? Still delicious. Just toss the elbow macaroni in boiling water, melt that butter with flour until it’s a golden roux, then stir in the sharp cheddar and American cheese until it’s thick and velvety. Honestly, the only measuring you’ll do is eyeballing the cheese.
- Creamy Crunch Combo: Between us, the secret’s in the cheeses. Sharp cheddar brings that tangy bite, while American cheese—yes, the processed kind—adds that melt-in-your-mouth creaminess. The roux gives it that just-right thickness, and the elbow macaroni? Perfect for soaking up every last bit. It’s the kind of flavor that makes you reach for seconds without even thinking.
- Lunchbox Hero: This isn’t just dinner. Pack it in a thermos for work, or send it in a container for your kid’s school lunch—it’s a hit every time. (My son used to trade his for goldfish crackers, no joke.) The texture holds up surprisingly well, and the cheddar’s sharpness keeps it from getting bland. Plus, it’s the one meal that actually makes mealtime easier when I’m running late.
- Budget Stretch: Here’s what sold me—this recipe costs me about $3 for a full family serving. Butter, flour, and cheese are pantry staples, and elbow macaroni is cheaper than most pasta. The leftovers? Even better reheated than the first go-round. Between us, I’ve fed a houseful of kids (and hungry adults) for under $10 with this one dish. That’s a win.
Step-by-step instructions for original Betty Crocker macaroni and cheese
Here's how to recreate that nostalgic, crispy-topped comfort classic—just like Betty made it famous.
🍳 Step 1: Cook the Elbow Macaroni to Perfect Al Dente
Bring a large pot of water to a rolling boil and add 1.5 lbs elbow macaroni. Stir immediately to prevent sticking. Cook for 8-9 minutes until the pasta is al dente—it should have a slight bite but still be tender. Drain in a colander and set aside, reserving 1 cup of the pasta water.
Here's the thing—overcooking kills the texture. You want pasta that's firm enough to hold up to the creamy cheese sauce. Taste-test a piece when you're unsure. The reserved pasta water is pure gold for adjusting the sauce consistency later.
🥘 Step 2: Make the Classic Roux and Cheese Sauce
In a large Dutch oven or heavy pot, melt 0.5 cup unsalted butter over medium heat until foaming subsides. Whisk in 0.5 cup all-purpose flour and cook for 2 minutes until the mixture turns golden brown—this is your roux. Don't walk away; it burns easily.
Slowly whisk in 2 cups milk over 2 minutes to prevent lumps. Stir constantly until the sauce thickens enough to coat the back of a spoon. Remove from heat and stir in 2 cups shredded sharp cheddar cheese and 1 cup shredded American cheese until completely melted. The sauce should be velvety smooth with no graininess.
🍳 Step 3: Combine Pasta and Sauce for Maximum Cheesiness
Add the drained macaroni to the cheese sauce and stir gently to coat every noodle. Season with 1.5 tsp salt, 0.5 tsp black pepper, 0.5 tsp garlic powder, and 0.5 tsp dried mustard. Taste and adjust seasoning—this is where the magic happens. The mustard adds that classic tangy depth.
If the sauce seems too thick, add reserved pasta water 1 tablespoon at a time until it reaches a creamy, spoonable consistency. You want it thick enough to cling to the pasta but still smooth enough to coat easily. This is the heart of that nostalgic texture.
🔥 Step 4: Create the Signature Crispy Topping
Preheat your broiler to high. Spread the macaroni and cheese evenly in a greased 9x13-inch baking dish. In a small bowl, mix 0.5 cup panko breadcrumbs with 2 tbsp melted butter until evenly coated. Sprinkle this mixture evenly over the top of the casserole.
Here's the moment that matters: place the dish on a baking sheet (to catch any drips) and broil for 3-5 minutes until the topping is deep golden brown and bubbly. Watch it closely—it goes from perfect to burnt in seconds. The crispy topping is what makes this dish legendary.
⏰ Step 5: Rest and Serve for Maximum Comfort
Remove from the broiler and let the macaroni and cheese rest for 5 minutes. This resting period lets the sauce set slightly and the flavors meld together. The crispy topping will firm up as it cools, giving you that satisfying crunch with every bite.
Garnish with 2 tbsp chopped green onions and serve immediately. The contrast of the warm, creamy pasta with the crispy topping is what makes this dish so irresistibly comforting. Leftovers? Store covered in the fridge for up to 3 days, but I doubt they'll last that long.
Pro Tips For Making Original Betty Crocker Macaroni And Cheese
- Cook Pasta Al Dente: DESCRIPTION: The recipe calls for "tender" pasta, but that’s code for al dente—firm to the bite. Boil elbows for 1 minute less than package instructions, then finish cooking in the cheese sauce. I learned this the hard way after serving mushy mac and cheese to a crowd who side-eyed me like I’d committed a crime.
- Melt Cheese Slowly: DESCRIPTION: Dump all the cheese into the roux at once? Bad move. Add shredded cheddar and American cheese in two batches, stirring constantly over medium-low heat. The first batch melts smoothly; the second keeps the sauce from breaking or turning grainy. (Yes, even if you’re impatient like me.)
- Shred Cheese Like a Pro: DESCRIPTION: Pre-shredded cheese has anti-caking agents that make the sauce clump. Use a box grater for sharp cheddar and hand-rip American cheese—it melts cleaner. Skip the pre-shredded stuff unless you’re okay with texture issues. (Your future self will thank you.)
- Toast the Flour First: DESCRIPTION: The recipe says to cook flour and butter until bubbly, but don’t rush it. Let that roux blond for 30 seconds—just until the raw flour smell fades. This removes the flour’s bite and gives the sauce a richer, nuttier base. (Does it look weird? Yes. Does it work? Every single time.)
Dietary considerations for this original betty crocker macaroni and cheese
Gluten-Free Adaptation
For a gluten-free version, swap the elbow macaroni for gluten-free elbow pasta—brands like Barilla or De Cecco make excellent options. Their texture holds up beautifully in the creamy sauce.
For the roux, use gluten-free all-purpose flour (like Bob's Red Mill 1-to-1) and cook it with the butter just as you would regular flour. The key is to whisk constantly to prevent lumps. 🥄
Dairy-Free Options
To make this dish dairy-free, replace the butter with olive oil or vegan butter (like Miyoko's), and use dairy-free milk (such as unsweetened almond or oat milk) in the sauce.
For cheese, dairy-free cheddar shreds (like Violife or Follow Your Heart) work surprisingly well—they melt smoothly and add that tangy kick. Just reduce the milk by ¼ cup to compensate for the extra moisture in plant-based cheeses.
Lower-Carb Swaps
Craving mac and cheese but watching your carbs? Swap the pasta for shredded chicken or cauliflower florets (roasted until tender). For the sauce, use heavy cream instead of milk and thicken it with a cornstarch slurry (1 tbsp cornstarch + 1 tbsp water) instead of a roux.
The result is a creamy, cheesy dish with far fewer carbs—just skip the breadcrumb topping or use crushed pork rinds for a crispy, low-carb alternative. 🥦
Vegetarian-Friendly
This recipe is already vegetarian, but if you're looking to boost the protein, stir in ½ cup cooked chickpeas or crumbled tofu into the sauce. For extra richness, fold in ¼ cup sour cream or Greek yogurt at the end—it adds a tangy depth that balances the cheesiness.
The dish stays true to its comforting roots while sneaking in a little extra nutrition. 🌱
Allergy Considerations
For those with dairy allergies, focus on the dairy-free swaps above, but also check your breadcrumbs—some contain milk powder. Panko is usually safe, but Japanese-style brands are the most reliable.
If you're avoiding mustard, omit the dried mustard entirely or replace it with an extra ¼ tsp garlic powder for depth. Always double-check labels, especially on pre-shredded cheeses, which often contain anti-caking agents with dairy traces.
Kid-Friendly Adjustments
Pickier eaters might balk at the green onions, so skip them entirely. For extra kid appeal, fold in ½ cup finely diced ham or diced hot dogs into the sauce before baking.
You can also make the sauce slightly sweeter by adding ½ tsp sugar or 1 tbsp tomato paste for a subtle umami boost. Serve with steamed broccoli or carrot sticks on the side to balance the meal—kids love dipping their veggies in the leftover sauce! 🧒
Nutrition facts
Frequently asked questions
Why does the original Betty Crocker recipe use both cheddar and American cheese?
The sharp cheddar delivers that classic tangy bite we love, while the American cheese adds smooth meltability and a nostalgic creaminess. This blend creates the perfect balance of flavor and texture that makes this dish so iconic—just like the original boxed mix many of us grew up with!
Can I make this mac and cheese stovetop instead of baking it?
Simply assemble the pasta and sauce in a pot, then stir in the breadcrumb-butter mixture at the end. Keep the heat on low and cover for 5 minutes to let the breadcrumbs soften slightly. The result will be creamy with a slightly crispy texture rather than fully crispy. Perfect for quick weeknight meals!
What's the secret to getting the breadcrumb topping perfectly crispy?
Broil on high heat for 3-5 minutes—no more! Watch it like a hawk, as it burns fast. Use a baking sheet underneath to catch drips, and make sure your panko is evenly coated with butter. For extra insurance, broil for 2 minutes, then switch to low broil for the final minute to finish gently.
Can I make this ahead of time?
Yes! Assemble the dish (without the topping) up to 24 hours ahead and refrigerate. When ready to serve, bake at 350°F for 20 minutes, then broil with fresh breadcrumbs for 3-5 minutes. For freezing, portion before topping and freeze for up to 2 months. Thaw overnight in the fridge and reheat covered at 350°F for 30 minutes.
What's the best way to fix a sauce that's too thick or too thin?
For a thick sauce, thin it with reserved pasta water 1 tablespoon at a time until creamy. If it's too thin, remove from heat and stir in 1 teaspoon cornstarch mixed with 1 teaspoon cold water until smooth. The key is patience—add liquid gradually to avoid breaking the sauce's consistency.