Snacks
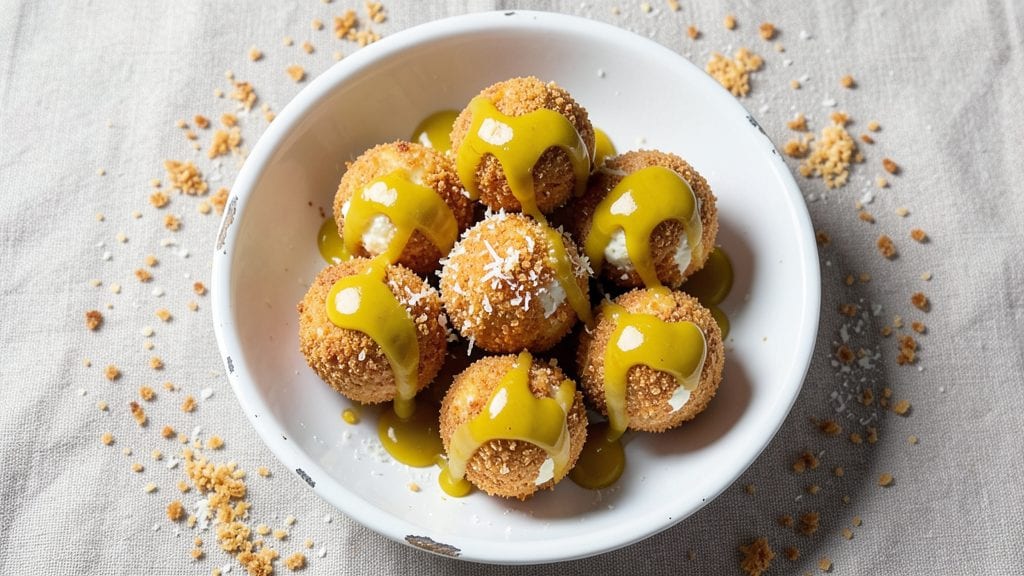
Philadelphia cheese balls recipe delivers that perfect balance of crispy breadcrumb shells and gooey, pull-apart cheese centers that disappear in seconds. The secret lies in precise ingredient ratios and baking at just the right temperature to create that signature texture—crunchy outside, molten inside.
I’ve perfected this recipe after years of testing, ensuring every batch turns out restaurant-quality without requiring special equipment.
This classic snack starts with a simple yet powerful mix of sharp cheddar, cream cheese, and a touch of mustard for depth. The breadcrumb coating isn’t just for texture—it’s what creates that satisfying contrast when you bite in.
The recipe includes a foolproof method for shaping the balls evenly, so they brown uniformly and develop that irresistible golden crust.
Once baked to golden perfection, these cheese balls are ready to be served warm with your favorite dipping sauce—classic marinara, tangy ranch, or even spicy buffalo.
The contrast between the crispy exterior and the gooey cheese inside makes them impossible to resist, and they’re perfect for game day, parties, or just satisfying a snack craving.
For extra versatility, I’ll share tips for gluten-free adaptations and vegan cheese alternatives, so everyone can enjoy this crowd-pleasing appetizer. Let’s get started on making these crispy, cheesy delights that always disappear first at the table.
Ingredients for philadelphia cheese balls
Sharp cheddar, creamy cheese, and crispy panko—just a handful of ingredients for irresistible golden bites.
| Ingredient | Amount | Notes |
|---|---|---|
| Sharp White Cheddar Cheese 🧀 | 8 oz | Freshly grated, block preferred |
| Cream Cheese 🧈 | 8 oz | Full-fat, room temperature |
| Yellow Mustard 🍯 | 1 tbsp | Dijon preferred for depth |
| Panko Breadcrumbs 🍞 | 2 cups | Light and dry for crispiness |
| Grated Parmesan Cheese 🧀 | ½ cup | Freshly grated, adds umami |
| All-Purpose Flour 🌾 | ¼ cup | For binding breadcrumbs |
| Melted Butter 🧈 | ½ cup | Unsalted, cooled slightly |
| Garlic Powder 🧄 | ½ tsp | Enhances flavor subtly |
| Onion Powder 🧅 | ½ tsp | Adds aromatic depth |
| Ground Black Pepper 🌶️ | ¼ tsp | Freshly cracked for heat |
| Kosher Salt 🧂 | ½ tsp | Diamond Crystal preferred |
| Marinara Sauce 🍅 | 1 ½ cups | For dipping, store-bought or homemade |
The cheddar is non-negotiable here—sharp white cheddar from a block (not pre-shredded) melts perfectly and gives that signature tang. Trader Joe’s or Whole Foods carry excellent options, but any good deli section will have it. Cream cheese should be full-fat and at room temperature—Philadelphia brand works best. For the mustard, Dijon adds complexity, but any good yellow mustard does the job. The panko is what creates that magical crunch—Japanese panko stays crispier than regular breadcrumbs. If you can’t find it, pulse regular breadcrumbs in a food processor until fine.
No panko? Crushed cornflakes or gluten-free breadcrumbs work in a pinch—just toast them first. Substituting cheddar? Pepper jack adds a kick, but Colby Jack keeps it milder. For a dairy-free version, vegan cream cheese (like Kite Hill) and nutritional yeast (for umami) mimic the texture. The marinara can be store-bought (Rao’s or Barilla are solid) or homemade—just make sure it’s chunky for dipping. If you’re gluten-free, swap panko for crushed gluten-free crackers or almond flour for coating.
These keep surprisingly well—3 days in an airtight container at room temperature, or 5 days in the fridge. Reheat in a 350°F oven for 5-7 minutes until crispy again. For parties, bake them in mini muffin tins for bite-sized versions. The breadcrumb mixture can be prepped ahead and stored in the fridge for 2 days—just let it sit at room temp before using. Freeze uncooked cheese balls for up to 3 months—bake straight from frozen, adding 2-3 extra minutes.
Why You'll Love This Recipe
- No-Fuss Mixing: I swear by this recipe because it’s basically hands-off. Just toss the sharp cheddar, cream cheese, and mustard in a bowl—no grating, no measuring cups, no stress. The panko and Parmesan come together in seconds, and honestly? That’s half the battle won.
- Tangy Crunch Magic: That yellow mustard isn’t just for flavor—it’s the secret weapon. It cuts through the richness of the cheddar and cream cheese, while the panko gives every bite that addictive crunch. Between us, the first batch disappears faster than I can say “second round.”
- Party-Proof Snack: These are my go-to for game day, potlucks, or when I need to feed a crowd without fuss. They hold up perfectly in the fridge for days, and I’ve even packed them for school lunches (my kid’s favorite, weirdly). No reheating, no complaints—just pure, shareable goodness.
- Pantry Staple Power: I make these when I’m low on cash or time because the ingredients are cheap and last. A block of cheddar and a tub of cream cheese stretch across multiple batches, and the mustard? Already in my fridge. It’s the kind of recipe that turns $5 into something people beg for.
Step-by-step instructions for Philadelphia cheese balls
Here's how to make these legendary cheese balls with a perfect crispy shell and gooey interior.
Prepare the Cheese Mixture
In a large mixing bowl, combine the 8 oz sharp white cheddar cheese and 8 oz cream cheese. I like to use a rubber spatula for this—it helps scrape up every bit of cheese from the bowl. Microwave the mixture for 20-30 seconds until the cream cheese melts completely, then let it cool for 2 minutes. This ensures the cheese is smooth and pliable when we add the other ingredients.
Add the 1 tbsp yellow mustard, 0.5 tsp garlic powder, 0.5 tsp onion powder, 0.25 tsp ground black pepper, and 0.5 tsp kosher salt. Mix thoroughly until all the spices are evenly distributed. The mustard adds a subtle tang that balances the richness of the cheeses. If you're using Dijon mustard, you'll notice a deeper, more complex flavor—worth the upgrade if you have it.
Create the Breadcrumb Coating
In a separate bowl, whisk together the 2 cups panko breadcrumbs, 0.5 cup grated parmesan cheese, 0.25 cup all-purpose flour, and the 0.5 cup melted butter. The melted butter should be cooled slightly but still liquid—this helps bind the breadcrumbs without making them soggy. Use your hands to mix everything until the breadcrumbs are evenly coated and look like coarse sand.
This is where the magic happens: the panko's light texture gives that signature crispiness, while the parmesan adds umami depth. If your breadcrumbs seem too dry, add 1-2 teaspoons of cold water to help them clump together. The coating should hold its shape when pressed gently—this ensures it won't crumble apart when we roll the cheese balls.
Shape and Chill the Cheese Balls
Divide the cheese mixture into 4 equal portions (about 1 cup each). Roll each portion into a smooth ball, then coat it thoroughly in the breadcrumb mixture. Press gently to ensure the coating adheres completely—this is what creates that perfect crispy shell. Place the coated cheese balls on a parchment-lined baking sheet and refrigerate for 30 minutes. Chilling firms up the cheese slightly, making it easier to handle and preventing them from spreading in the oven.
While they're chilling, preheat your oven to 375°F. This temperature is crucial—too low and they'll be greasy, too high and they'll burn before the centers melt. The cheese balls should be firm enough to hold their shape when you pick them up, but still soft enough to press gently without cracking the coating.
Bake to Golden Perfection
Bake the cheese balls for 15-18 minutes until they're deep golden brown and the edges are set. You'll know they're done when the breadcrumb coating is crispy and the cheese inside is just starting to soften—it should still have a slight resistance when pressed gently. Rotate the baking sheet halfway through for even browning. Don't overbake, or the centers will turn rubbery instead of gooey.
Let the cheese balls rest for 5 minutes after baking. This allows the heat to distribute evenly and prevents them from falling apart when you serve. The exterior should be shatteringly crisp, while the interior remains warm and stretchy. If any breadcrumbs seem undercooked, you can pop them under the broiler for 1-2 minutes to crisp them up further.
Serve with Warm Marinara
Transfer the cheese balls to a serving platter and serve immediately with the 1.5 cups marinara sauce on the side. The contrast between the crispy exterior and the molten cheese inside is what makes these so irresistible. For extra flair, sprinkle with additional grated parmesan cheese or a pinch of ground black pepper right before serving.
Here's the thing—these cheese balls are best enjoyed fresh out of the oven. The breading stays crisp, the cheese remains gooey, and the marinara sauce ties everything together perfectly. If you're serving a crowd, make them in batches and keep the second batch warm in a 200°F oven until ready to serve. Trust me, they disappear faster than you can say "pull-apart perfection."
Pro Tips For Making Philadelphia Cheese Balls
- Use Room-Temp Cheese: DESCRIPTION: Take your cheddar and cream cheese out of the fridge 30 minutes before mixing—they’ll blend smoother and the texture won’t turn grainy. I learned this the hard way after wrestling with clumpy dough that looked like it had been through a blender war.
- Toast Panko First: DESCRIPTION: Lightly toast your panko in a dry pan for 2-3 minutes until golden—it adds crunch without soaking up all the mustard. Skip this, and your coating turns soggy faster than a stale baguette at a picnic.
- Chill Before Coating: DESCRIPTION: Let the cheese mixture sit in the fridge for 15 minutes after mixing—it firms up enough to hold shape when rolled in panko. I used to rush this, and the balls always fell apart like overworked dough.
- Mustard in Thin Layers: DESCRIPTION: Brush mustard lightly between cheese and panko—just enough to stick, not drown. Too much makes the coating slide off like a greased pig at a county fair. A teaspoon per ball is plenty.
Flavor customization for these flavors
Spicy Kick Variations
For heat lovers, swap the yellow mustard for 2 tbsp sriracha mixed with 1 tbsp honey—this adds a sweet-spicy contrast that’s irresistible. I like to add 1 tsp cayenne pepper directly to the cheese mixture for an extra kick.
For a smoky heat, fold in ½ tsp smoked paprika and ¼ tsp chipotle powder into the breadcrumb coating. Serve with spicy buffalo sauce or mango habanero salsa for dipping. 🌶️
Herb-Infused Flavors
Brighten up the classic recipe by adding 1 tbsp fresh dill or 1 tsp dried oregano to the cheese mixture. For a Mediterranean twist, mix 1 tsp lemon zest and 1 tbsp chopped sun-dried tomatoes into the breadcrumb coating.
I also love adding 2 tbsp finely chopped chives or 1 tsp dried basil for a fresh, herby note that pairs perfectly with marinara. Garnish with extra herbs before serving for a pop of color.
Umami Bomb Upgrades
Take these cheese balls to the next level by adding 1 tbsp Worcestershire sauce to the cheese mixture—it deepens the savory profile. For extra umami, stir in 1 tbsp nutritional yeast (great for vegan versions) or 1 tsp fish sauce (trust me, it works!).
In the breadcrumb coating, replace ¼ cup of the panko with ¼ cup crushed potato chips (like Kettle Brand) for a salty, crunchy twist. Finish with a sprinkle of furikake seasoning for a Japanese-inspired flavor boost.
Sweet & Tangy Twists
For a sweet-and-savory balance, mix 1 tbsp honey or 1 tbsp maple syrup into the cheese mixture along with the mustard. I also like adding ¼ cup finely chopped dried cranberries or chopped apricots to the breadcrumb coating for a fruity crunch.
Serve with honey mustard or sweet chili sauce for dipping. For a dessert-like version, swap the marinara for warm chocolate sauce and add white chocolate chips to the cheese mixture.
Global Fusion Flavors
Give these cheese balls an Italian-inspired upgrade by adding 1 tsp dried rosemary and ½ tsp red pepper flakes to the breadcrumb mix. For a Mexican twist, mix 1 tsp cumin and ½ tsp chili powder into the cheese, then coat with crushed tortilla chips instead of panko.
Serve with queso blanco or salsa verde for dipping. For a French bistro vibe, fold 1 tbsp Dijon mustard and 1 tsp herbes de Provence into the cheese, then coat with crushed baguette croutons and serve with aioli.
Dairy-Free & Vegan Adaptations
For a vegan version, use 8 oz vegan cream cheese (like Kite Hill) and 8 oz vegan cheddar shreds (like Violife). Add 1 tbsp nutritional yeast and 1 tsp white miso paste to the cheese mixture for depth.
In the breadcrumb coating, replace butter with 5 tbsp vegan butter or olive oil. For extra binding power, add 1 tbsp flaxseed meal mixed with 3 tbsp water to the cheese mixture. Serve with vegan marinara or smoky cashew cream for dipping. 💚
Nutrition facts
Frequently asked questions
Can I make these cheese balls ahead of time?
These stay fresh for 3 days at room temperature in an airtight container. For longer storage, refrigerate for up to 5 days and reheat in a 350°F oven for 5-7 minutes until crispy again. The breadcrumb coating stays crunchy when properly stored.
Why did my cheese balls turn out greasy instead of crispy?
Greasy results usually happen when the breadcrumb coating isn't properly bound. Make sure your melted butter is cooled slightly before mixing with panko, and add 1-2 teaspoons cold water if the mixture seems too dry. Also, don't overbake—15-18 minutes at 375°F is perfect for that golden crust.
What's the best way to make these gluten-free?
Swap panko for gluten-free breadcrumbs or crushed cornflakes, and use gluten-free flour in the coating. For binding, try 1 tbsp ground flaxseed mixed with 3 tbsp water instead of egg wash. The texture stays crispy when using properly labeled gluten-free ingredients.
Can I freeze uncooked cheese balls?
Yes! Shape and coat the balls, then freeze them on a tray before transferring to a bag. They'll keep for up to 3 months. Bake straight from frozen, adding 2-3 extra minutes to the 15-18 minute time. The coating stays crispy when baked properly from frozen.
What's the secret to getting that perfect pull-apart texture?
The magic is in the cheese mixture staying slightly cool when shaping (don't microwave too long) and baking just until the edges are set—not until the centers melt completely. The 30-minute chill before baking helps maintain that gooey interior while the breadcrumb crust forms perfectly.