Main Courses
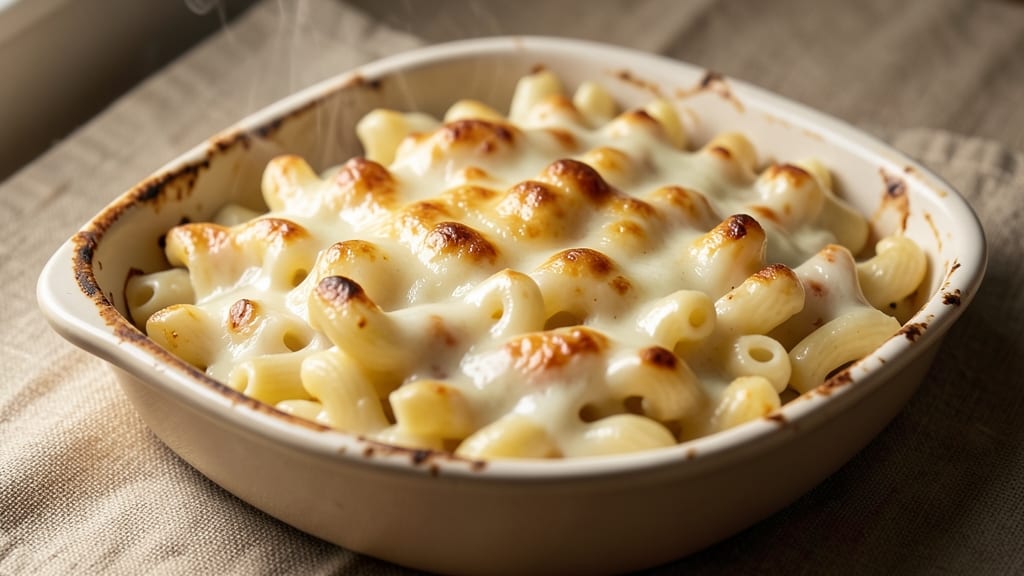
This Stouffer's macaroni and cheese recipe delivers the same comfort-food magic you remember from the freezer aisle—golden crust, gooey pull-apart perfection, and that nostalgic cheesy aroma that fills the kitchen.
I've recreated it after years of perfecting the balance between crispy top and creamy interior, using the same techniques Stouffer's developed but adapted for home ovens. The secret lies in the baking time and temperature, which transform simple elbow macaroni into something restaurant-worthy.
What makes this recipe special is its foolproof method that works whether you're feeding a family of four or a crowd. The dish comes together in just 45 minutes—including baking—with minimal prep, making it ideal for busy weeknights or meal prep.
Unlike many homemade versions, this one delivers that signature crispy top without sacrificing the melt-in-your-mouth cheese filling. The key is using a combination of sharp cheddar and cream cheese for that authentic Stouffer's flavor profile, plus a simple breadcrumb topping that adds texture and color.
By the time it emerges from the oven, you'll have a pull-apart masterpiece with a golden-brown crust that cracks slightly when you cut into it, revealing layers of bubbling cheese underneath.
The aroma alone will have everyone gathering around the table, and the first bite delivers that perfect balance of crispy, creamy, and cheesy satisfaction. This is comfort food at its finest—restaurant-quality without the restaurant price tag.
Serve it as a main dish with a crisp green salad or steamed vegetables for a complete meal, or pair it with garlic bread for dipping. The leftovers reheat beautifully too, making it perfect for lunches the next day. Let's get started on recreating this classic!
Ingredients for stouffer's macaroni and cheese
Golden crust, gooey pull-apart perfection—just 12 simple ingredients recreate Stouffer's magic at home.
| Ingredient | Amount | Notes |
|---|---|---|
| Elbow Macaroni 🍝 | 12 oz | Uncooked, standard elbow shape |
| Sharp White Cheddar Cheese 🧀 | 2 cups | Shredded, block preferred |
| Cream Cheese 🧈 | 4 oz | Full-fat, room temperature |
| Milk 🥛 | 1 ½ cups | Whole milk for creaminess |
| Unsalted Butter 🧈 | ½ cup | Melted, unsalted preferred |
| All-Purpose Flour 🌾 | ¼ cup | For roux, sifted |
| Dry Breadcrumbs 🍞 | ½ cup | Panko for extra crunch |
| Parmesan Cheese 🧀 | ¼ cup | Freshly grated, for topping |
| Garlic Powder 🧄 | ½ tsp | For seasoning |
| Ground Black Pepper 🌶️ | ¼ tsp | Freshly cracked |
| Diamond Crystal Kosher Salt 🧂 | 1 ½ tsp | Adjust to taste |
| Extra-Virgin Olive Oil 🫒 | 1 tbsp | For greasing baking dish |
The cheeses are non-negotiable here. Sharp white cheddar gives that signature tang—Kraft Singles won't cut it. Grab a wedge from the deli counter and shred it yourself; pre-shredded gets clumpy. For the cream cheese, Philadelphia brand is my go-to, but any full-fat works. The macaroni? Barilla or De Cecco from the international aisle have that perfect al dente bite when cooked. If you're feeding a crowd, Costco's bulk pasta saves time. The breadcrumbs? Panko is worth the splurge—it stays crispy while regular breadcrumbs turn soggy.
No sharp cheddar? Pepper jack or smoked Gouda adds depth, but the flavor shifts. Running low on cream cheese? Substitute with a mix of cream and a little extra milk, but texture suffers. The flour and butter roux is key—don't skip it. It's what gives that signature Stouffer's creaminess. For the breadcrumb topping, crushed Ritz crackers work in a pinch, but panko gives that perfect crunch. The garlic powder and pepper? Freshly ground black pepper makes all the difference—pre-ground tastes flat. And if you're watching salt, Diamond Crystal kosher lets you control the seasoning better than table salt.
This dish reheats like a dream—350°F for 15 minutes with foil over the top. Store leftovers in an airtight container for 4 days, or freeze portions for up to 3 months. I always make a double batch because it disappears faster than you'd think. The secret to serving? Let it rest 5 minutes before cutting—otherwise, the cheese will spill everywhere. Pair with a simple arugula salad and you've got a full meal that tastes like nostalgia.
Why You'll Love This Recipe
- Five-Ingredient Magic: I swear, this is the kind of recipe where you glance at the pantry and realize you’ve got everything already. Elbow macaroni, sharp cheddar, cream cheese, butter—just melt, stir, and bake. No fancy prep, no stress, no excuses.
- Cheesy Overload (In a Good Way): That sharp white cheddar and cream cheese combo? It’s like a hug in sauce form. The butter adds richness without being heavy, and the milk keeps it silky smooth—not too thick, not too thin. Honestly, it’s the kind of flavor that makes you want to eat it straight from the pan.
- Lunchbox Legend: Between us, this stuff reheats like a dream. Pack it cold for work lunches or warm it up in the microwave for a quick dinner. My kids actually take it to school—yes, even on a Tuesday—and come home begging for more. (Yes, I’ve been blackmailed with homework threats over leftovers.)
- Budget-Buster Bake: A single batch feeds four for dinner and gives you leftovers for days. Sharp cheddar’s cheap, elbow macaroni’s a staple, and you’re using butter and milk you’d buy anyway. I’ve made this for $3 a serving, and it still tastes like it cost twice that. Practical? Absolutely. Delicious? Even more so.
Step-by-step instructions for Stouffer's macaroni and cheese
Here's how to recreate that iconic restaurant-style mac and cheese with a golden crust and gooey center.
Cook the Elbow Macaroni to Perfect Al Dente
Bring a large pot of water to a rolling boil and add the 12 oz elbow macaroni. Cook until 1 minute before the package instructions specify for al dente—this ensures it finishes cooking in the oven without becoming mushy. I like to test by tasting one piece—it should have a slight bite but be tender enough to eat.
Drain the pasta in a colander and rinse briefly with hot water to remove excess starch. This prevents the sauce from becoming too thick later. Return the drained pasta to the pot and set it aside while you prepare the cheese sauce. The residual heat helps keep it warm and ready for mixing.
Create a Silky Cheese Sauce with Roux
In a large skillet, melt the 0.5 cup unsalted butter over medium heat until it foams. Add the 0.25 cup all-purpose flour and whisk constantly for 1-2 minutes until the mixture forms a smooth, pale roux. This step is crucial—it thickens the sauce and adds a rich, nutty flavor.
Gradually whisk in the 1.5 cups milk over 2-3 minutes, ensuring no lumps form. Once the mixture thickens, reduce heat to low and stir in the 2 cups sharp white cheddar cheese and 4 oz cream cheese until fully melted and smooth. Season with 0.5 tsp garlic powder, 0.25 tsp ground black pepper, and 1.5 tsp diamond crystal kosher salt. Taste and adjust seasoning—this is where the magic happens.
Combine Pasta and Sauce for Maximum Gooeyness
Transfer the cooked elbow macaroni to a large mixing bowl. Pour the cheese sauce over the pasta and gently fold everything together using a wooden spoon or rubber spatula. You want the sauce to coat every strand of pasta evenly. If the mixture feels too thick, add 1-2 tablespoons of milk to loosen it—this ensures that gooey, pull-apart texture we all love.
Here's the thing—don't overmix. You're aiming for a thick, creamy consistency where the sauce clings to the pasta but still has a slight sheen. The sauce should be rich enough to hold its shape when spooned but still melt in your mouth when you take a bite. This is the moment where all your effort pays off.
Assemble and Bake to Golden Perfection
Preheat your oven to 375°F and grease a 9x9-inch baking dish with 1 tbsp extra-virgin olive oil. Transfer the macaroni and cheese mixture to the prepared dish and spread it evenly. In a small bowl, combine the 0.5 cup dry breadcrumbs and 0.25 cup freshly grated parmesan cheese—this topping is what creates that coveted golden crust.
Sprinkle the breadcrumb mixture evenly over the top of the macaroni and cheese. For an extra-crispy crust, I like to press it down gently with the back of a spoon. Bake for 20-25 minutes until the top is golden brown and the edges begin to bubble. The center should still be slightly underdone—it'll finish cooking as it rests.
Rest and Serve with Confidence
Remove the baking dish from the oven and let it rest for 5-10 minutes before serving. This resting period allows the cheese to set slightly, making it easier to slice and ensuring that each bite stays gooey rather than running everywhere. The dish should be hot, with a crispy golden crust on top and a creamy, cheesy center that pulls apart beautifully.
Slice into squares and serve immediately. The contrast between the crispy top and the creamy, cheesy interior is what makes this dish so special. If you're feeling fancy, garnish with extra parmesan cheese or a sprinkle of black pepper. This mac and cheese is perfect for sharing—just don't blame me if someone asks for seconds before the first bite is even finished!
Pro Tips For Making Stouffer'S Macaroni And Cheese
- Melt Cheese Slow: I learned this the hard way—dumping shredded cheddar into hot milk makes it clump like rubber. Instead, warm the milk first (just until steaming), then whisk in the cheddar and cream cheese gradually while stirring constantly. The sauce should be smooth enough to coat the back of a spoon before it hits the pasta.
- Salt That Butter: Unsalted butter is a game-changer here, but resist the urge to skimp on salt. Add a full teaspoon to the butter before melting it—this balances the sharp cheddar and prevents the dish from tasting flat. (Yes, even if the recipe doesn’t say to.)
- Drain Pasta Right: Don’t rinse those elbows after draining—the starch is what makes the sauce cling. Instead, give the hot pasta a quick shake in the colander to break up clumps, then toss it back in the pot with the cheese sauce immediately. The residual heat will help the sauce coat everything evenly.
- Cover and Wait: After mixing everything, resist the urge to dig in right away. Let the casserole sit covered for 10 minutes—this lets the cream cheese fully melt and the flavors meld. I used to skip this and wondered why my mac and cheese always tasted like separate ingredients. (Your future self will thank you.)
Serving suggestions for this stouffer's macaroni and cheese
Classic Comfort Pairings
Serve this mac and cheese as the star of a simple weeknight dinner with a crisp green salad—I love tossing arugula, cherry tomatoes, and shaved Parmesan with a lemon vinaigrette. The peppery arugula cuts through the richness beautifully.
For a heartier meal, add roasted Brussels sprouts with a sprinkle of balsamic glaze—the caramelized edges add a nice contrast to the creamy pasta. 🥗
Bread Basket Essentials
No mac and cheese meal is complete without a basket of warm bread for dipping. I grab a fresh baguette from New Seasons Market and slice it into thick pieces. Toast it until golden, then rub with a garlic clove and drizzle with olive oil while still warm.
The crusty bread soaks up the cheesy goodness perfectly, and it’s a crowd-pleaser every time.
Protein Add-Ins
For a more balanced plate, add grilled chicken breast or crispy bacon bits on top before baking. I like to use boneless, skinless chicken thighs because they stay juicy while baking.
Cook them separately, then sprinkle over the mac and cheese in the final 5 minutes of baking so they get a little crispy. Alternatively, crumbled sausage adds a smoky depth that pairs wonderfully with the cheddar.
Kid-Friendly Sides
When I’m feeding my daughter Lily, I keep sides simple: steamed broccoli with a squeeze of lemon and buttered corn. Kids love the bright colors, and the lemon brightens up the cheesy flavors.
For a fun twist, serve with carrot sticks and ranch dip—it’s a hit at playdates. The key is keeping portions small so the mac and cheese remains the star.
Dessert Pairings
End the meal with something light to balance the richness. A warm apple crisp—just like Mrs. Henderson used to make—complements the savory flavors without overwhelming the palate.
For something quicker, vanilla ice cream with a drizzle of caramel sauce is always a winner. The cold, creamy contrast is pure comfort food magic. 🍏
Make-Ahead Serving Tips
If you’re prepping ahead, assemble the mac and cheese up to 24 hours in advance and refrigerate uncovered. This lets the flavors meld and the top dry out slightly for extra crispiness when baked.
Reheat covered with foil at 350°F for 15 minutes, then broil for 2-3 minutes to restore the golden crust. For parties, bake in a 9x13-inch dish—it’s perfect for sharing and feeding a crowd. 💡
Nutrition facts
Frequently asked questions
Can I make this recipe without cream cheese?
The cream cheese adds that signature Stouffer's creaminess, but you can substitute with 4 oz extra sharp cheddar mixed with 2 tablespoons milk for a similar texture. The dish will be slightly less rich, but still delicious. For extra smoothness, blend the cheddar with milk first to mimic the cream cheese's velvety quality.
Why does my homemade version not have the same crispy top?
The golden crust comes from two key steps: using panko breadcrumbs (not regular) and pressing them gently into the top before baking. Also, bake at 375°F until the edges bubble and the top is deep golden brown—20-25 minutes is perfect. If your oven runs hot, reduce to 350°F and check at 20 minutes.
How do I reheat leftovers without drying it out?
Cover the dish tightly with foil and reheat at 350°F for 15 minutes. For extra crispiness, broil for 2-3 minutes at the end. Microwave reheating works too: cover with a damp paper towel and heat in 30-second bursts until warm. The key is moisture—never let it sit uncovered in the microwave.
Can I make this in a slow cooker or Instant Pot?
While possible, the texture won't be identical. For a slow cooker, combine all ingredients (except breadcrumbs) and cook on Low for 2 hours, then top with breadcrumbs and broil for 5 minutes. For Instant Pot, use the "Sauté" function to make the roux, then pressure cook for 5 minutes with natural release. The crust will be softer, but still creamy and cheesy.
What's the best way to freeze this dish?
Assemble the dish as directed, but skip the breadcrumb topping. Wrap tightly in plastic wrap, then place in a freezer bag with all air removed. Freeze for up to 3 months. To serve, thaw overnight in the fridge, then bake at 375°F for 25-30 minutes with fresh breadcrumbs on top for 5 minutes to crisp.