
Appetizers
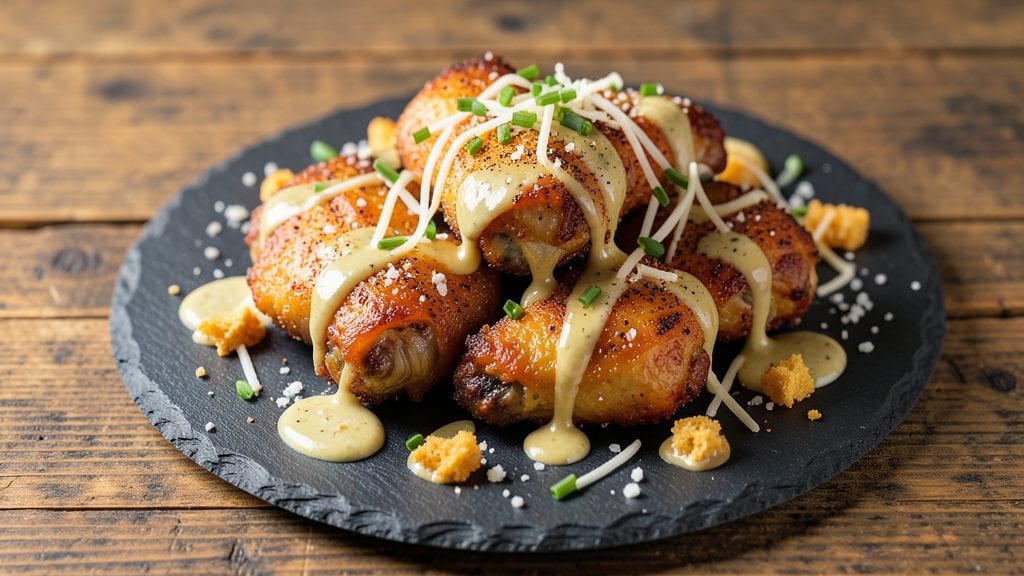
This cheese wings recipe delivers the perfect balance of crispy, golden-brown wings with a gooey, melted cheese crust that’s impossible to resist. After years of testing different methods, I’ve perfected a foolproof technique that ensures every bite has that satisfying crunch and rich, cheesy flavor—no deep-frying required.
The secret lies in the right combination of breading and cheese, baked to perfection for that irresistible texture.
What sets this recipe apart is the simplicity of achieving restaurant-quality results at home. You’ll start with chicken wings coated in a light, crispy breading, then layer them with a blend of cheeses that melts into a luscious, golden crust.
Baking at the right temperature ensures the wings stay juicy inside while developing that addictive crunch outside. This method is foolproof, making it ideal for game day, parties, or even a cozy night in.
The final result is wings that are crispy, cheesy, and packed with flavor—each bite offering a satisfying contrast of textures. Whether you prefer classic ranch or tangy blue cheese for dipping, these wings will become your new favorite appetizer.
Ready in under an hour, they’re perfect for feeding a crowd without the fuss of frying. Let’s get started!
For extra indulgence, you can customize the cheese blend or add toppings like bacon bits or green onions. This recipe scales easily, so you can make a small batch for two or double it for a party.
The key is patience—letting the cheese melt just right ensures that gooey, pull-apart perfection. Trust me, once you try these, you’ll never go back to plain wings again.
Ingredients for cheese wings
Fourteen simple ingredients for wings that taste like they came from your favorite sports bar.
| Ingredient | Amount | Notes |
|---|---|---|
| Chicken Wings 🍗 | 2 lbs | Dry well before breading |
| All-Purpose Flour 🌾 | 1 ½ cups | For light, crispy breading |
| Large Eggs 🥚 | 2 whole | Beaten for egg wash |
| Shredded Mozzarella Cheese 🧀 | 2 cups | Part-skim or whole milk |
| Shredded Cheddar Cheese 🧀 | 1 cup | Sharp or mild preferred |
| Grated Parmesan Cheese 🧀 | ½ cup | Freshly grated preferred |
| Seasoned Breadcrumbs 🍞 | 1 cup | Panko for extra crunch |
| Garlic Powder 🧄 | 1 tbsp | For flavor depth |
| Onion Powder 🧅 | 1 tbsp | Adds savory base |
| Paprika 🌶️ | 1 tsp | Smoked for extra flavor |
| Salt 🧂 | 1 ½ tsp | Kosher or sea salt |
| Black Pepper 🌶️ | ½ tsp | Freshly ground preferred |
| Butter 🧈 | 2 tbsp | Melted for extra richness |
| Olive Oil 🫒 | 2 tbsp | For crispy coating |
The chicken wings are non-negotiable—look for good marbling and avoid any with a gamey smell. Costco or Trader Joe's usually have the best prices for bulk wings. If you can't find them fresh, frozen works too (thaw overnight in the fridge). The cheeses make all the difference: shred your own if possible—pre-shredded gets gummy when melted. For the breadcrumbs, panko gives that extra crunch, but regular breadcrumbs work in a pinch. Just make sure they're seasoned—plain ones won't stick as well.
No mozzarella? Monterey Jack or Colby melts just as well. Short on cheddar? Pepper Jack adds heat. The butter and olive oil combo is key for that crispy crust—don't skip the olive oil. Want extra flavor? Toss in 1/2 tsp of cayenne with the spices. The wings can be prepped ahead: bread them, then store in the fridge for up to 24 hours before baking. Just let them sit at room temp for 30 minutes before baking for even cooking.
These wings reheat beautifully—350°F for 5-10 minutes until crispy again. Store leftovers in an airtight container for 3-4 days or freeze for up to 3 months. For freezing, bake first, then portion into single servings. The cheese crust gets a little softer after reheating, but it's still delicious. Double the recipe for parties—they disappear fast.
Why You'll Love This Recipe
- No-Fuss Breading: I swear by the flour-egg-dip method—just toss the wings, no fancy seasoning blends. The eggs bind it all together while keeping the coating light, so you get that perfect crunch without the mess of wet ingredients.
- Melty Magic Inside: That combo of mozzarella and cheddar? Chef’s kiss. The mozz pulls while the cheddar melts into gooey strings—every bite has that stretchy, warm pull you can’t get with just one cheese. (Pro tip: Use block cheese, not pre-shredded.)
- Game for Any Gathering: Game day? Weeknight dinner? My kids’ birthday party? This recipe handles it all—serve with ranch for a crowd or swap the cheeses for a spicier kick. Honestly, I’ve made it for everything from tailgates to lazy Sundays.
- Leftovers That Still Win: No sad, dry wings here. The cheese stays creamy even reheated, and the crispy coating holds up for days. I double the batch just to have backup—because nothing beats pulling these straight from the freezer for a quick snack.
Step-by-step instructions for crispy baked wings with gooey cheese crust
Here's how to make wings with that perfect crunchy exterior and melty cheese interior every time.
Prepare the Wings for Maximum Crispiness
Start by patting the 2 lbs chicken wings completely dry with paper towels. This step is crucial—any moisture will prevent that perfect crispy crust. Separate the wings into drumettes and flats, removing any excess fat or skin. Place them on a baking sheet and refrigerate for 30 minutes to chill completely before breading.
While the wings chill, melt the 2 tbsp butter and 2 tbsp olive oil together in a small saucepan over low heat. This creates a flavorful oil that will help crisp the breading. Remove from heat and let cool slightly—you want it warm but not hot when you use it later. The butter adds richness that makes the cheese crust even more decadent.
Create the Perfect Breading Station
In a shallow bowl, combine the 1.5 cups all-purpose flour with 1 tbsp garlic powder, 1 tbsp onion powder, 1 tsp paprika, 1.5 tsp salt, and 0.5 tsp black pepper. Mix well to distribute the seasonings evenly. This dry mixture forms the foundation of your crispy crust, so make sure it's thoroughly combined.
In another bowl, beat the 2 whole large eggs until just combined. The eggs act as the glue that binds the breading to the wings. In a third bowl, mix together the 2 cups shredded mozzarella cheese, 1 cup shredded cheddar cheese, and 0.5 cup grated parmesan cheese. This cheese blend gives you that perfect gooey texture when baked. Keep all three bowls ready for dipping.
Bread the Wings in Three Layers
Working in batches to avoid overcrowding, dip each wing first into the egg wash, letting any excess drip off. Then coat thoroughly in the flour mixture, pressing gently to adhere. Transfer to the cheese mixture and press firmly so the cheese sticks to the flour. Finally, roll each wing in the 1 cup seasoned breadcrumbs, pressing again to ensure good coverage.
Place the breaded wings on a parchment-lined baking sheet, leaving space between each piece. This allows hot air to circulate and ensures even browning. For extra crispiness, I like to press down gently on each wing with my fingers before baking. The wings are now ready for the oven—don't skip the chilling step that follows, as it makes all the difference.
Chill and Bake for Perfect Texture
Return the prepared wings to the refrigerator and chill uncovered for 20 minutes. This chilling step is essential—it firms up the breading and prevents the wings from spreading too much in the oven. The cheese will also start to slightly melt and adhere better to the breading during this time.
Preheat your oven to 425°F while the wings chill. Once preheated, bake the wings for 25-30 minutes, flipping them halfway through, until they're golden brown and the cheese is fully melted and bubbly. You'll know they're done when the cheese is gooey and the breading is crispy all the way through—no soggy spots allowed!
Finish with Warm Sauce (Optional)
For serving, I like to toss the hot wings in a simple warm sauce made from the remaining melted butter and olive oil mixture with a splash of hot water to thin it slightly. This creates a glossy coating that enhances the flavors without overpowering the cheese. Serve immediately with celery sticks, carrot sticks, and your favorite dipping sauce.
These wings should have a perfect balance of crispy breading and gooey melted cheese in every bite. The secret is in the layering technique and proper baking temperature—don't rush this step. The result is wings that are crispy on the outside, cheesy on the inside, and packed with flavor throughout.
Pro Tips For Making Cheese Wings
- Preheat Your Oven High: DESCRIPTION: Don’t just turn it on—get it to 425°F (220°C) and let it scream for 10 minutes. I used to skip this, and my cheese would either melt into a sad puddle or stay stubbornly solid. High heat at the start guarantees that crispy breading and gooey cheese happen at the same time, not one after the other.
- Use Block Cheese: DESCRIPTION: Skip the pre-shredded stuff—it’s coated in anti-caking agents that turn your cheese into a dry, clumpy mess. Buy a block of sharp cheddar and fresh mozzarella, shred it yourself with a box grater, and pat it dry with a paper towel. Less moisture means less soggy breading.
- Double-Coat the Wings: DESCRIPTION: One dip in flour and egg isn’t enough—do it twice. After the first coat, let the wings rest on a wire rack for 5 minutes so the flour absorbs the egg. Then dip again. This keeps the breading from sliding off when you toss them in the oven, and you’ll get that perfect crunch every time.
- Don’t Overcrowd the Pan: DESCRIPTION: If you’re frying (or air-frying) the wings before baking, work in batches. A crowded pan steams the wings instead of searing them, leading to greasy, uneven breading. Give them space—they’ll crisp up faster, and your kitchen won’t smell like a deep-fryer fire drill.
Health benefits of these flavors
Protein Powerhouse
Each serving of these cheese wings delivers about 25 grams of protein per 4-ounce portion, making them an excellent choice for muscle repair and satiety. The chicken breast in the wings provides all nine essential amino acids, while the cheese adds extra protein and calcium.
This makes them a surprisingly balanced snack compared to traditional fried wings. 💪
Calcium Boost
The combination of mozzarella, cheddar, and parmesan delivers a significant calcium boost—about 20% of your daily value per serving. Calcium is essential for bone health, muscle function, and even maintaining a healthy weight.
The parmesan also adds a umami depth that enhances flavor without adding excess sodium. I always opt for freshly grated cheese to maximize flavor and texture.
Lower Fat Option
By using part-skim mozzarella and baking instead of frying, you can reduce the fat content while still maintaining that irresistible cheesy flavor. A single serving contains about 12 grams of fat, which is much lower than traditional fried wings.
The baking method also preserves more of the chicken's natural juices, keeping the meat tender and flavorful.
Vitamin Boost
These wings provide a surprising amount of vitamins, including vitamin B6 (important for energy metabolism) and vitamin A (from the cheese, which supports vision and immune function). The garlic and onion powders add extra antioxidants that help combat inflammation.
The combination of these nutrients makes this dish more than just a tasty appetizer—it's a flavorful way to boost your nutrition.
Energy-Friendly
With about 250 calories per serving, these cheese wings offer a satisfying snack without being overly indulgent. The protein and fiber from the breading help keep you full longer, preventing those mid-afternoon energy crashes.
I often make a double batch for game day because they're perfect for sharing while still being a smart choice for active lifestyles. 🌟
Customizable Nutrition
You can easily adapt this recipe to fit different dietary needs. For a lower-carb option, swap the breadcrumbs for almond flour or crushed pork rinds. To reduce sodium, use low-sodium cheese and seasonings.
The beauty of this recipe is that it's flexible—you can adjust the ingredients to match your health goals while still enjoying that cheesy, crispy goodness. The key is balance, and this dish delivers it perfectly.
Nutrition facts
Frequently asked questions
Can I make these cheese wings ahead of time?
Bread the wings and store them in an airtight container in the fridge for up to 24 hours before baking. For best results, let them sit at room temperature for 30 minutes before baking to ensure even cooking. The cheese will melt beautifully when fresh from the fridge.
What's the best way to reheat leftover cheese wings?
Reheat in a 350°F oven for 5-10 minutes until crispy again. For extra crunch, broil for 1-2 minutes at the end. Microwaving can make the cheese rubbery, so oven reheating is always best. Store leftovers in an airtight container for 3-4 days or freeze for 3 months.
Can I use frozen chicken wings instead of fresh?
Yes! Just thaw them overnight in the fridge before using. Pat them completely dry before breading to prevent soggy spots. Frozen wings work perfectly and often save money. The texture will be just as crispy if you follow the same drying and chilling steps.
What cheese alternatives work best if I'm avoiding dairy?
For a dairy-free version, try using dairy-free shredded cheddar and vegan mozzarella (brands like Violife or Daiya work well). The breading technique remains the same—just ensure your cheese melts properly. The flavor will be slightly different but still delicious with that crispy texture.
Why did my cheese wings turn out soggy?
Soggy wings usually happen from moisture—either from wet wings or skipping the chilling step. Always pat wings completely dry and chill them uncovered for 20 minutes before baking. Overcrowding on the baking sheet can also trap steam, so leave space between wings for proper airflow.