Desserts
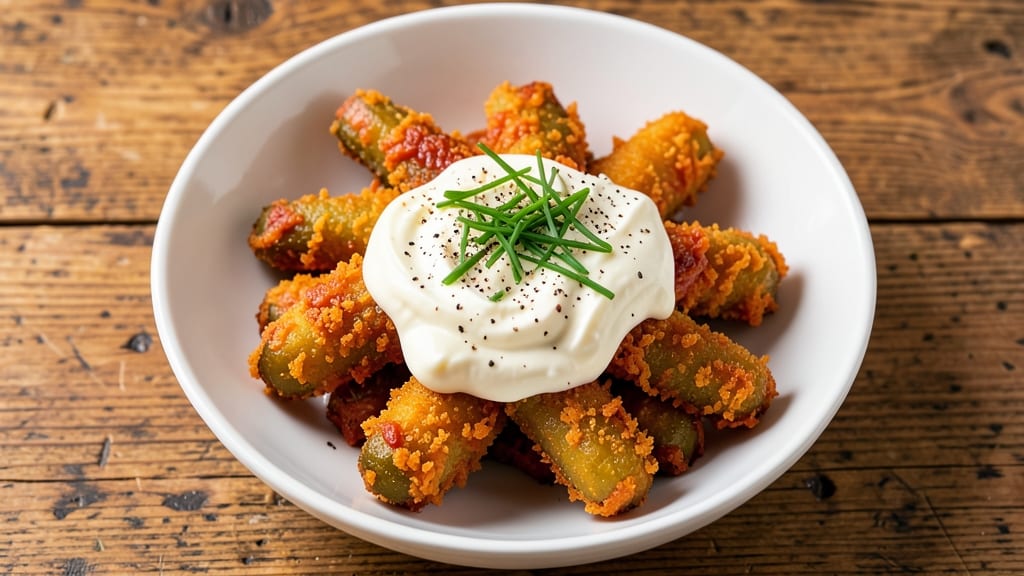
Indulge in this deep fried pickles with cream cheese recipe, where crispy batter meets rich, velvety cheese for a tangy, crunchy twist on a Southern favorite. The contrast of crispy, golden pickles with a velvety cream cheese dip creates a balance of textures and flavors that’s impossible to resist.
I developed this recipe after years of experimenting with fried foods, and it’s now a crowd favorite at every gathering.
The secret to perfect deep fried pickles lies in the batter—light enough to stay crispy but sturdy enough to hold the pickles together. You’ll need just five simple ingredients for the batter, and the frying process is straightforward once you master the 350°F oil temperature.
The cream cheese dip, meanwhile, is a foolproof blend of tangy cream cheese, sour cream, and a touch of garlic powder for depth.
What you’ll end up with is a plate of golden, shatteringly crispy pickles paired with a smooth, cooling cream cheese dip that cuts through the richness. The pickles maintain their tangy crunch while the dip adds a creamy contrast, making every bite a perfect harmony of textures.
This dish is ideal for game day, parties, or even a late-night snack when you’re craving something bold.
Serve immediately for maximum crispiness, but don’t worry—this recipe is designed to be restaurant-quality at home without the fuss. Whether you’re hosting or just treating yourself, these deep fried pickles with cream cheese will disappear faster than you can say "second round." Let’s get started!
Ingredients for deep fried pickles with cream cheese
Five simple ingredients for golden batter, plus eight for velvety cream cheese dip—crunchy, tangy perfection.
| Ingredient | Amount | Notes |
|---|---|---|
| Dill Pickle Spears 🥒 | 1 lb | 1-inch slices for even frying |
| All-Purpose Flour 🌾 | 1 cup | Lightly spooned, not packed |
| Cornstarch 🌽 | ¼ cup | For extra crispiness |
| Baking Powder 🍞 | 1 tbsp | For light, airy batter |
| Salt 🧂 | 1 tsp | Kosher or sea salt |
| Vegetable Oil 🫒 | 3 cups | For frying (peanut oil preferred) |
| Cream Cheese 🧈 | 8 oz | Full-fat, room temperature |
| Sour Cream 🥛 | ½ cup | Full-fat preferred |
| Garlic Powder 🧄 | 1 tsp | For subtle depth |
| Paprika 🌶️ | ½ tsp | Smoked for extra flavor |
| Lemon Juice 🍋 | 1 tbsp | Freshly squeezed |
| Black Pepper 🌶️ | ¼ tsp | Freshly ground |
The pickles are the star, so dill spears cut into 1-inch slices are ideal—they fry up perfectly without falling apart. Trader Joe's or Kroger usually carry the best jarred pickles for this (look for firm, crisp spears). If you're using whole pickles, slice them lengthwise for even cooking. The batter's secret? Cornstarch keeps them extra crispy, but if you're out, add another tablespoon of flour. Baking powder gives that light, airy texture—don't skip it. And trust me, peanut oil for frying is worth the trip to the international aisle if you can find it.
No cornstarch? Extra flour works fine, but your pickles might not be quite as crispy. Out of baking powder? Self-rising flour at 1/4 cup gives you the lift you need. For the dip, full-fat cream cheese is a must—it's rich enough to stand up to the tangy pickles. No sour cream? Greek yogurt at half the amount works in a pinch, but it'll be a little thinner. The smoked paprika adds a subtle depth that makes this dip restaurant-quality—regular paprika works, but you'll miss that smoky note. And if you're feeling fancy, a pinch of cayenne gives it a little kick.
This batter fries best fresh, but you can prep it 1 hour ahead and keep it in the fridge—just let it sit at room temp for 10 minutes before frying. The dip? Make it 2 hours ahead—the flavors meld beautifully. Store the batter in an airtight container for 2 days, and the dip keeps for 3 days in the fridge. For serving, I like to keep the batter in a paper-lined basket so it stays crispy. And if you're making this for a crowd, double the dip—it disappears fast!
Why You'll Love This Recipe
- The contrast is next-level: that shatteringly crisp batter meets the tangy pickle core, then the cool, creamy swirl of room-temperature cream cheese—it’s like a party in your mouth. (Yes, even on a Tuesday night.)
- Here’s what sold me: I can stretch a jar of pickles into three batches, and the batter costs pennies. Fry once, reheat in the oven later—no waste, no guilt, just more crispy goodness waiting in the fridge.
Step-by-step instructions for crispy fried pickles with cream cheese dip
Here's how to create perfectly golden, crunchy fried pickles paired with a tangy cream cheese dip.
Prepare the Pickle Battering Mixture
In a large bowl, whisk together the 1 cup all-purpose flour, 0.25 cup cornstarch, 1 tablespoon baking powder, 1 teaspoon salt, 1 teaspoon garlic powder, and 0.5 teaspoon paprika. The cornstarch is key here—it creates that extra-crispy texture we're after. Stir until completely combined and no lumps remain.
In a separate small bowl, mix the 8 ounces cream cheese and 0.5 cup sour cream until smooth. Add the 1 tablespoon lemon juice and 0.25 teaspoon black pepper, stirring until fully incorporated. This tangy dip will balance the crispy fried pickles beautifully. Cover both mixtures and set aside while you prep the pickles.
Cut and Prep the Pickle Spears
Pat the 1 pound dill pickle spears completely dry with paper towels—this is crucial for maximum crispiness. Using a sharp knife, cut each spear into 1-inch pieces. You should have about 4 cups of pickle pieces total. Arrange them on a baking sheet in a single layer and let them sit at room temperature for 15 minutes before frying.
This drying step ensures the batter adheres properly and creates that perfect golden crust. If you skip this, your pickles will absorb too much oil and turn greasy instead of crispy. Trust me, this small step makes all the difference in the final texture.
Fry the Pickles to Golden Perfection
Heat 3 cups vegetable oil in a deep skillet or Dutch oven over medium heat until it reaches 350°F—use a thermometer for accuracy. The oil should be hot enough that when you drop in a test piece of pickle, it sizzles vigorously and rises to the surface immediately.
Working in batches (don't overcrowd the pan), carefully add the pickle pieces to the hot oil. Fry for 2-3 minutes per side until they turn a deep golden brown color. You'll know they're done when they're crispy all the way through and release easily from the oil. Transfer them to a paper towel-lined plate to drain excess oil. Repeat with remaining batches, maintaining the oil temperature at 350°F throughout.
Assemble and Serve Immediately
While the pickles are still hot and crispy, toss them gently in the flour mixture to coat lightly. This extra step adds another layer of crunch. Arrange the fried pickles on a serving platter or directly in a large bowl.
Serve immediately with the cream cheese dip on the side or drizzled generously over the top. The contrast between the crispy, salty pickles and the cool, tangy dip is what makes this dish so irresistible. Enjoy while they're hot—fried pickles lose their crispiness quickly once they cool.
Keep Them Crispy (Pro Tip!)
Here's the secret to serving these like a pro: Place the fried pickles in a 200°F oven for up to 10 minutes if you need to hold them before serving. This keeps them warm and maintains their crispiness. If you're serving a crowd, fry in batches and keep them warm in the oven between batches.
For extra flavor, sprinkle with additional garlic powder or paprika right before serving. The dip can be made ahead and chilled until ready to serve—just give it a quick stir before using to bring back that perfect smooth consistency.
Pro Tips For Making Deep Fried Pickles With Cream Cheese
- PAT THE PICKLES DRY: I learned this the hard way—wet pickle spears will turn your batter into a sad, greasy sludge. Grab paper towels and really press between them, especially around the stems. You want them bone-dry, not just damp.
- MIX CORNSTARCH LAST: After burning three batches of fried pickles, I finally figured out the cornstarch needs to go in after the flour and baking powder. Stir it in right before dredging—this keeps the crust crispy instead of gummy. (Yes, even if you're impatient like me.)
- FRIED IN BATCHES: Crowding the oil lowers the temperature, and suddenly you're left with soggy, half-cooked pickles. Fry 3-4 spears at a time, giving them space to float freely. Your future self will thank you when the first batch comes out golden and crunchy.
- COOL BEFORE DIPPING: Sounds weird, but it works: Let the fried pickles rest on a wire rack for 2-3 minutes before dipping in cream cheese. The crust sets up better, and the cheese doesn’t turn into a greasy mess. (I know, I know—waiting is hard.)
Regional styles of this dish
Southern Comfort Style
In the American South, fried pickles are a classic bar snack, often served with a spicy ranch dip or blue cheese dressing—but my Southern-inspired twist swaps that for a creamy, tangy cream cheese dip with a kick.
I add ½ teaspoon cayenne to the dip for heat lovers, and serve them on a cast iron skillet straight from the fryer for that rustic touch. 🌶️
Texas BBQ Twist
Texas takes fried pickles to the next level by adding smoked paprika and chopped jalapeños to the batter, then serving them with a cooling chipotle cream cheese dip. I like to use pickles with the skin on for extra texture, and a light dusting of Cajun seasoning before serving.
This version is a game-day staple in Texas BBQ joints.
Midwest Pub Favorite
The Midwest loves their fried pickles with a beer-battered dip—I’ve adapted this by adding ½ cup of cold lager to the batter for extra crispiness.
The cream cheese dip gets a touch of horseradish for a peppery kick, and I serve them with pickle juice on the side for dipping. This version is perfect for sports bars and tailgates.
California Fusion
For a West Coast twist, I blend avocado into the cream cheese dip and add lime zest for brightness. The pickles are tossed in a chili-lime seasoning before frying, and served with sliced jicama on the side. This fusion version is light yet bold, perfect for summer gatherings. 🍋
New England Clam Shack
In New England, fried pickles are often paired with seafood-inspired dips, so I mix smoked salmon into the cream cheese for a briny twist. The pickles get a dill and lemon zest batter, and I serve them with crispy fried onions on top.
This coastal version is a hit at seafood festivals and clam shacks.
Global Street Food
For a global twist, I’ve tried a Korean-inspired version with gochujang in the dip and sesame seeds on the pickles. A Japanese take uses miso paste in the batter and yuzu cream cheese for the dip. These international flavors turn a classic snack into a world tour of taste! 🌍
Nutrition facts
Frequently asked questions
Can I use regular pickles instead of dill spears?
Yes, but dill spears are ideal because their firm texture holds up better during frying. If using regular pickles, slice them into 1-inch pieces and pat them completely dry to prevent sogginess. Kosher dill pickles work well too—just avoid overly soft or mushy ones. The flavor will be slightly different but still delicious!
Why did my fried pickles turn out greasy instead of crispy?
Greasy pickles usually mean one of two things: either the oil wasn't hot enough (350°F is critical) or the pickles weren't dried thoroughly before frying. Always pat them completely dry with paper towels and let them sit for 15 minutes before coating. Using cornstarch in the batter also helps create that signature crunch.
How long will the batter and dip keep?
The batter stays fresh for up to 2 days in an airtight container, while the cream cheese dip keeps for 3 days in the fridge. For best results, make the dip ahead of time—it tastes even better after flavors meld! Reheat the dip gently in the microwave (10-second bursts) before serving to restore its smooth texture.
Can I make this recipe without deep frying?
For a lighter version, try baking the pickles at 400°F for 12-15 minutes after coating them in the batter. They won't be as crispy, but it's a great alternative. You can also air-fry at 375°F for 8-10 minutes, shaking the basket halfway. The texture will differ, but the flavor combo still works beautifully!
What's the best way to serve these for a crowd?
Fry in batches and keep the finished pickles warm in a 200°F oven while you serve. Use a large cast iron skillet for serving—it adds rustic charm and helps maintain crispiness. Double the dip recipe and serve it in a slow cooker on the "warm" setting to keep it creamy. Add extra garlic powder or smoked paprika to the dip right before serving for a flavor boost!