
Main Courses
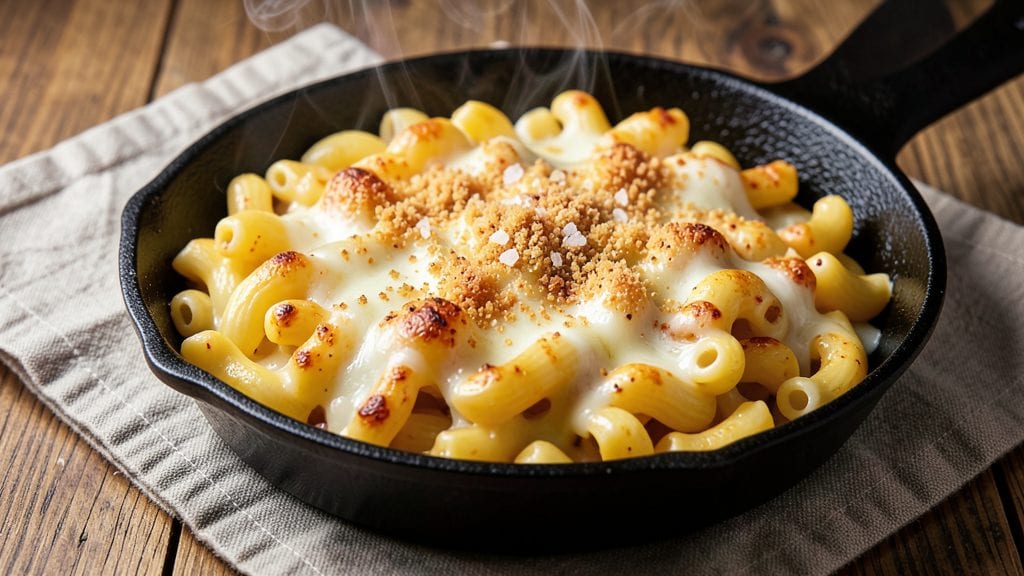
This no-boil baked macaroni and cheese recipe delivers velvety, restaurant-quality comfort without the pasta-boiling hassle or the long wait for creamy perfection. The secret lies in using elbow macaroni that cooks directly in the oven with the cheese sauce, creating a rich, tender texture without overcooking.
I developed this method after years of burning mac and cheese or ending up with dry pasta—this version is foolproof and ready in 30 minutes total.
The technique is simple but game-changing: no pre-boiling means no starchy water to dilute your sauce, and the pasta absorbs the creamy cheese mixture as it bakes. You'll need just 5 ingredients (plus pantry staples) and one baking dish, making this the ultimate one-pan solution for weeknight dinners.
The result is a bubbling, golden-topped casserole with melt-in-your-mouth pasta and a sauce so creamy it clings to every bite.
What makes this recipe truly special is how it balances simplicity with professional results. The cheese sauce develops depth from slow baking, while the pasta stays al dente—no mushy centers here.
Topped with buttery breadcrumbs, it becomes a crispy-edged masterpiece that's impossible to resist. This is comfort food at its finest: restaurant-quality without the fuss.
Perfect for feeding a family or meal prepping for the week, this mac and cheese adapts easily with add-ins like bacon, broccoli, or extra sharp cheddar. Let's make dinner effortless while keeping flavor front and center.
Ingredients for no boil baked macaroni and cheese
Five core ingredients plus pantry staples transform into restaurant-quality mac and cheese without boiling pasta.
| Ingredient | Amount | Notes |
|---|---|---|
| Elbow Macaroni 🍝 | 8 oz | Uncooked, medium or elbow shape |
| Sharp White Cheddar Cheese 🧀 | 2 cups | Shredded, block preferred |
| Heavy Cream 🥛 | 1 cup | Full-fat for optimal creaminess |
| Whole Milk 🥛 | ½ cup | Warmed slightly for smoother sauce |
| Butter 🧈 | ½ cup | Unsalted, melted and cooled |
| Diamond Crystal Kosher Salt 🧂 | 1 ½ tsp | Adjust to taste |
| Ground Black Pepper 🌶️ | ½ tsp | Freshly cracked for brightness |
| Garlic Powder 🧄 | ½ tsp | For subtle depth |
| Panko Breadcrumbs 🍞 | ¼ cup | Toasted for crispy topping |
| Extra-Virgin Olive Oil 🫒 | 1 tbsp | For crisping breadcrumbs |
| Nutmeg 🌿 | ¼ tsp | Freshly grated for warmth |
The cheese selection is non-negotiable for professional results. Sharp white cheddar from a specialty cheese shop or Whole Foods delivers the tangy depth that pre-shredded lacks—look for blocks labeled 'aged 12+ months'. Heavy cream must be full-fat; reduced-fat versions create a grainy sauce. For the pasta, De Cecco or Barilla elbow macaroni cooks evenly and holds shape during baking. The kosher salt is critical—Diamond Crystal dissolves completely, unlike table salt which can leave gritty residue. Store your cheddar block wrapped in parchment paper to prevent drying out, and keep the pasta in an airtight container for up to 6 months.
No sharp cheddar? Monterey Jack or Gruyère work in a pinch, though texture differs slightly. Substitute heavy cream with half-and-half plus 1 tbsp melted butter for similar richness. For a dairy-free option, use full-fat coconut milk (though texture will be lighter). The garlic powder can be swapped for 1/4 tsp fresh minced garlic if you prefer. When measuring breadcrumbs, lightly pack them—don't compress—to maintain airiness. For added depth, consider 1/4 tsp smoked paprika in the breadcrumb mix, though traditionalists may prefer to omit it. All ingredients should be room temperature before combining for a perfectly smooth sauce.
This casserole reheats beautifully—3-4 minutes at 350°F restores its creamy perfection. Store leftovers covered in the refrigerator for 4-5 days, though flavor peaks within the first 24 hours. For meal prep, portion into glass baking dishes (they reheat more evenly than metal) and freeze for up to 3 months. The breadcrumb topping can be prepped ahead and stored in the freezer—simply toast with olive oil before baking. For extra crispiness, broil for 1-2 minutes at the end, watching closely to prevent burning. The nutmeg should be freshly grated; pre-ground loses potency quickly after opening.
Why You'll Love This Recipe
- No-Pasta Prep: I swear by this trick—just toss raw elbows into the oven with the sauce. No boiling, no draining, no sticky mess. The pasta soaks up that rich cheddar-cream sauce while it bakes, and you end up with tender, creamy bites every time.
- Sharp Cheddar Magic: That sharp white chedddar isn’t just any cheese—it melts into a glossy, tangy sauce that clings to the pasta like it’s been hugging it all day. Honestly, the first time I used it, I nearly skipped dinner just to eat the sauce straight from the pan.
- Lunchbox Hero: Between us, this is my go-to for meal prep. Portion it into containers, and it reheats like a dream—no soggy pasta, no weird textures. My kids take it to school, my husband packs it for work, and I still sneak bites from the fridge. (Yes, even on a Tuesday night.)
- Budget Baked Bliss: A single block of sharp chedddar and a bag of elbow macaroni stretch this recipe farther than you’d think. The heavy cream and milk make it feel indulgent, but the cost? Ridiculously low. It’s the kind of dish that makes me feel like I’m feeding a crowd without breaking the bank.
Step-by-step instructions for no-boil baked macaroni and cheese
This method delivers velvety, one-pan perfection without the traditional boiling step.
Prepare the Cheese Sauce Base
In a large oven-safe skillet, melt the 0.5 cup butter over medium-low heat until completely liquid. Add the 2 cups sharp white cheddar cheese, stirring constantly with a wooden spoon until fully melted and smooth. This gradual melting prevents scorching while creating an ultra-creamy foundation.
Once the cheese is fully incorporated, reduce heat to low and whisk in the 1 cup heavy cream and 0.5 cup whole milk. Bring the mixture just to a gentle simmer, then immediately remove from heat. This prevents curdling while ensuring the sauce reaches proper temperature for the pasta to absorb its richness.
Cook the Pasta Directly in the Sauce
Add the 8 oz elbow macaroni to the skillet and stir to coat completely with the cheese sauce. The pasta will begin absorbing the sauce immediately, creating a creamy texture without needing pre-cooking. Cover the skillet and cook on medium-low heat for 10-12 minutes, stirring every 2-3 minutes to prevent sticking and ensure even coating.
You'll know it's ready when the pasta is tender but still slightly firm to the bite and the sauce has thickened to a velvety consistency. The key here is patience - don't rush the cooking time or the pasta will become mushy while the sauce remains too thin.
Season and Prepare for Baking
Remove the skillet from heat and stir in the 1.5 tsp diamond crystal kosher salt, 0.5 tsp ground black pepper, 0.5 tsp garlic powder, and 0.25 tsp nutmeg. The nutmeg adds a subtle warmth that complements the sharp cheddar perfectly. Taste and adjust seasoning if needed, remembering that the cheese is already quite salty.
Transfer the skillet to the preheated 375°F oven. The residual heat will continue cooking the pasta while the oven finishes melting any remaining cheese and creating a golden crust. Bake for 15-20 minutes until the top is lightly golden and the edges are bubbling.
Add the Crispy Breadcrumb Topping
While the macaroni and cheese bakes, toast the 0.25 cup panko breadcrumbs in a dry skillet over medium heat for 2-3 minutes until golden brown, stirring constantly. Remove from heat and immediately stir in the 1 tbsp extra-virgin olive oil to keep them crispy.
Spoon the toasted breadcrumbs evenly over the top of the baked macaroni and cheese. Return to the oven for an additional 3-5 minutes until the breadcrumbs are deep golden brown and the cheese underneath is fully melted and bubbly. The breadcrumbs should be crispy enough to contrast with the creamy pasta below.
Rest and Serve Immediately
Remove from the oven and let rest for 5 minutes before serving. This resting period allows the sauce to thicken slightly and the flavors to meld together. The dish should be creamy yet firm enough to hold its shape when served, with a perfect contrast of crispy breadcrumbs and velvety cheese.
Serve immediately with a side of steamed vegetables or a simple green salad. The no-boil method preserves more of the pasta's natural starch, creating a sauce that clings perfectly to each elbow. Each bite should deliver that signature mac and cheese experience without the traditional preparation steps.
Pro Tips For Making No Boil Baked Macaroni And Cheese
- Preheat That Pan: I learned this the hard way—cold butter in a cold pan means your sauce will seize up like a stubborn child. Melt the butter over medium heat first, then add the flour to make a roux. If you rush this, you’ll end up with a grainy, lumpy mess that no amount of whisking fixes.
- Shred Cheese Like a Pro: Buy pre-shredded cheese? Skip it—it’s coated with anti-caking agents that make your sauce look weird and taste off. Use a box grater or food processor for sharp white cheddar, then pulse until it’s fine but not powdery. Too fine, and your mac and cheese turns into a sad, gloppy blob.
- Don’t Overmix the Sauce: Once the cheese melts into the cream-milk mix, take the pan off the heat immediately—even a second longer can turn your sauce into scrambled eggs. Stir just until smooth, then let the residual heat finish the job. Overmixing = rubbery, cooked-out cheese.
- Bake Covered First: Crank the oven to 375°F (200°C), then bake the mac and cheese covered with foil for the first 20 minutes. This traps steam, cooks the pasta evenly, and keeps the top from drying out before it browns. Uncover only when the edges are bubbling like a witch’s cauldron—then broil for 2-3 minutes if you want that golden crust.
Pro cooking tips for no boil baked macaroni and cheese
Cheese Melting Mastery
Gradual melting is key to a silky sauce. I always melt the 2 cups sharp cheddar over medium-low heat while stirring constantly with a wooden spoon—this prevents scorching and creates tiny air pockets for that velvety texture.
If you see any lumps forming, immediately whisk in 1-2 tablespoons of warm milk to dissolve them. For extra insurance, I like to pre-shred my own cheese using a box grater—pre-shredded cheese contains anti-caking agents that can make the sauce grainy. 🧀
Pasta Timing Tricks
The no-boil method relies on precise timing. Cook the 8 oz elbow macaroni in the sauce for exactly 10-12 minutes on medium-low heat, stirring every 2-3 minutes.
If you peek and see the pasta isn't quite tender, resist the urge to crank the heat—this will make the sauce too thin. Instead, cover the skillet and let the residual heat finish the cooking. The pasta should be al dente with just a hint of bite, not mushy.
Oven Temperature Secrets
Preheat your oven to 375°F—this is non-negotiable for even baking. I use an oven thermometer to verify accuracy, as home ovens can vary by 25°F or more. When transferring the skillet, place it on the middle rack for consistent heat distribution.
The 15-20 minute baking time depends on your oven—if the edges brown too quickly, tent loosely with aluminum foil to prevent over-browning while keeping the center creamy.
Breadcrumb Crispiness
Toast your 0.25 cup panko breadcrumbs in a dry skillet until they're golden brown—about 2-3 minutes on medium heat. The moment they start to smell nutty is when they're ready. Immediately mix in the 1 tbsp olive oil to lock in that crispy texture.
For extra flair, I like to sprinkle a pinch of smoked paprika into the breadcrumbs before toasting—it adds a subtle smoky depth that pairs perfectly with the cheddar. 🍞
Resting Game-Changer
Never skip the 5-minute rest after baking—this lets the sauce thicken slightly and the flavors meld together. I've seen too many people cut into mac and cheese right away, only to watch it slide out of their dish.
The resting time also helps the breadcrumb topping set properly, creating that perfect crunch-creamy contrast. If you're serving this for a crowd, use this time to warm your serving dishes in the oven too—they'll stay hot longer.
Troubleshooting Tips
If your sauce looks too thin after baking, simply return the dish to the oven for 2-3 more minutes*—the residual heat will help it thicken. For extra richness, stir in 1 tablespoon of cold butter—it melts quickly and adds a luxurious mouthfeel.
And if your breadcrumbs lose their crispiness, broil for 1 minute—**but watch like a hawk to avoid burning. The secret to perfect mac and cheese is patience—don't rush any of these steps! ⏰
Nutrition facts
Frequently asked questions
Why does this recipe skip boiling the pasta?
The no-boil method creates a more velvety texture by letting the pasta absorb the cheese sauce gradually in the oven. This prevents starchy water from diluting the sauce, resulting in a richer, creamier dish. Plus, it cuts prep time by eliminating the boiling step entirely!
Can I use any type of cheese for this recipe?
For best results, stick with sharp white cheddar or Gruyère—they melt smoothly and provide that signature tang. Pre-shredded cheese won't work as well because it contains anti-caking agents that make the sauce grainy. If you must use a substitute, try Monterey Jack for a milder flavor.
How do I fix runny mac and cheese after baking?
If your dish is too thin, return it to the oven for 2-3 extra minutes to thicken. For immediate fixes, stir in 1 tablespoon of cold butter or sprinkle 1 tablespoon of flour over the top and stir gently. The residual heat will help it set properly.
Can I make this ahead of time?
Yes! Assemble the dish up to 24 hours ahead and refrigerate uncovered. Before baking, let it sit at room temperature for 30 minutes to even out. Add 1-2 tablespoons of milk if the sauce looks too thick after chilling. For freezing, bake first, then cool completely before storing in an airtight container for up to 3 months. Reheat covered at 350°F for 15-20 minutes.
What's the secret to crispy breadcrumbs?
Toast the panko in a dry skillet until golden brown (about 2-3 minutes1 tablespoon olive oil to lock in moisture. Spread them evenly over the top and broil for 1-2 minutes at the very end for extra crunch. Avoid using regular breadcrumbs—they absorb too much oil and stay soggy.